Table of Contents
- Installation notes
- UBC Student Email
- Ubuntu software settings
- Web browser
- Password manager
- Slack
- Visual Studio Code
- GitHub
- Git
- Python, Conda, and JupyterLab
- R, IRkernel, and RStudio
- Quarto CLI
- LaTeX
- PostgreSQL
- Docker
- VS Code extensions
- Improving the bash configuration
- Post-installation notes
Installation notes
If you have already installed Git, Latex, or any of the R or Python related packages please uninstall these and follow the instructions below to reinstall them (make sure to also remove any user configuration files and backup them if desired). In order to be able to support you effectively and minimize setup issues and software conflicts, we require all students to install the software stack the same way.
In all the sections below, if you are presented with the choice to download either a 64-bit (also called x64) or a 32-bit (also called x86) version of the application always choose the 64-bit version.
Once you have completed these installation instructions, make sure to follow the post-installation notes at the end to check that all software is setup correctly.
UBC Student Email
Please sign up for a UBC Student Email. This account will also grant you access to a range of UBC services, including Microsoft Teams and OneDrive. To do so navigate to https://it.ubc.ca/services/email-voice-internet/ubc-student-email-service and follow the instructions under “Get Started”.
Ubuntu software settings
To ensure that you are installing the right version of the software in this guide, open “Software & Updates” and make sure that the boxes in the screenshot are checked (this is the default configuration).

Web browser
In MDS we will be using many tools that work most reliably on Google Chrome and Firefox (including our online quiz software), so we recommend that you use one of these browsers.
- Firefox comes preinstalled with Ubuntu, so there is not need to download anything.
- To install Chrome, go to https://www.google.com/chrome/, click on “Download Chrome” choose the deb-file, download it to your computer and click on the downloaded file to install it.
Note: If you select “open with” and try to open the file directly with the Ubuntu Software app instead of downloading it first, the software app might complain that the file is not supported.
Password manager
A password manager is an efficient and convenient measure to protect your online accounts from most common threats. While you don’t strictly need to use one for any of the courses in MDS, we highly recommend that you set one up for your own benefit. Examples of reliable password managers include the ones built into Chrome and Firefox, as well as Bitwarden, and KeePassXC (if you prefer to sync your passwords manually).
Slack
For MDS program announcements, course forums, and correspondence we use the communication tool Slack. Slack can be accessed via the web browser, but we recommend using the Slack app, which can be installed via the Snap store/Ubuntu Software app through this link or via the downloadable deb-file from the slack website https://slack.com/intl/en-ca/downloads/linux.
UBC cloud computing resources
If you at any point during the MDS program are having an issue with your computer,
such as not being able to install all the software before the start of the program,
it is useful to know UBC offers a free online computing environment
that you can use as a backup to follow along in most of the MDS courses.
This is called Jupyter Open
and you can access it by logging into https://open.jupyter.ubc.ca/
with your UBC CWL.
Jupyter Open allow you to work with JupyterLab, R, Python, and Bash,
and you can install packages via the conda and pip package managers
(these are all explained further down in the installation instructions
and during the program).
Visual Studio Code
The open-source text editor Visual Studio Code (VS Code) is both a powerful text editor and a full-blown Python IDE, which we will use for more complex analysis. You can install VS Code either via the Snap store/Ubuntu software app through this link or via the downloadable deb-file from the VS code website https://code.visualstudio.com/download. The getting started instructions are here: https://code.visualstudio.com/docs/?dv=linux64_deb.
You can test that VS code is installed and can be opened from Terminal by restarting terminal and typing the following command:
code --version
you should see something like this if you were successful (does not have to be the exact same version):
1.103.1
GitHub
In MDS we will use the publicly available GitHub.com as well as an Enterprise version of GitHub hosted here at UBC, GitHub.ubc.ca. Please follow the set-up instructions for both below.
GitHub.com
Sign up for a free account at GitHub.com if you don’t have one already.
GitHub.ubc.ca
To add you to the MDS organization on Github.ubc.ca we need you to follow the instructions below:
- navigate to https://activate.github.ubc.ca and login with your CWL to setup their access
- wait 20 minutes
- login to Github.ubc.ca using your CWL credentials
This step is required for
- being able to store your work
- all homework submission and grading
- working collaboratively
Git
We will be using the command line version of Git as well as Git through RStudio and JupyterLab. Some of the Git commands we will use are only available since Git 2.23, so if your Git is older than this version, we ask you to update it using the following command:
sudo apt update
sudo apt install git
You can check your git version with the following command:
git --version
you should see something like this if you were successful:
git version 2.39.5
Configuring Git user info
Next, we need to configure Git by telling it your name and email. To do this type the following into the terminal (replacing Jane Doe and janedoe@example.com, with your name and email (the same you used on GitHub), respectively):
git config --global user.name "Jane Doe"
git config --global user.email janedoe@example.com
Note: To ensure that you haven’t made a typo in any of the above, you can view your global Git configurations by either opening the configuration file in a text editor (e.g. via the command
code ~/.gitconfig) or by typinggit config --list --global.
Setting VS Code as the default editor
To make programs run from the terminal (such as git) use VS Code by default, we will modify the bash configuration file ~/.bashrc. First, open it using VS Code:
code ~/.bashrc
Note: If you see any existing lines in your
~/.bashrcrelated to a previous Python or R installation, please remove these.
Append the following lines to the file:
# Set the default editor for programs launch from terminal
EDITOR="code --wait"
VISUAL=$EDITOR  # Use the same value as for "EDITOR" in the line above
Then save the file and exit VS Code.
Note: Most terminal programs will read the
EDITORenvironmental variable when determining which editor to use, but some readVISUAL, so we’re setting both to the same value.
In some cases, VScode is not set as the default text editor for git even after appending the two lines above, so to make sure it is registered properly, also run the following from your terminal:
git config --global core.editor "code --wait"
Python, Conda, and JupyterLab
Python and Conda
We will be using Python for a large part of the program, and conda as our Python package manager. To install Python and the conda package manager, we will use the Miniforge platform (read more here).
Select the appropriate link:
You can find the Mac ARM and Intel download links here: https://conda-forge.org/download/.
Make sure you use the Miniforge3 installers.
We will assume you downloaded the file into your Downloads folder.
Once downloaded, open up a terminal and run the following command (adjusting for the name of the installer you downloaded, for example Miniforge3-Linux-x86_64.sh)
bash ${HOME}/Downloads/Miniforge3.sh -b -p "${HOME}/miniforge3"
After installation run the following commands
source "${HOME}/miniforge3/etc/profile.d/conda.sh"
conda activate
conda init
After installation, restart the terminal. If the installation was successful, you will see (base) prepending to your prompt string. To confirm that conda is working, you can ask it which version was installed:
conda --version
which should return something like this:
conda 25.3.1
Note: If you see
zsh: command not found: conda, see the section on Bash above to set your default Terminal shell to Bash as opposed to Zsh.
Next, type the following to ask for the version of Python:
python --version
Make sure it returns Python 3.12.0 or greater:
Python 3.12.11
Installing Python packages
conda installs Python packages from different online repositories which are called “channels”.
A package needs to go through thorough testing before it is included in the default channel,
which is good for stability,
but also means that new versions will be delayed and fewer packages are available overall.
There is a community-driven effort called the conda-forge (read more here),
which provides more up to date packages.
Conda-forge is already set up when we installed Miniforge3
To install packages individually,
we can now use the following command:
conda install <package-name>.
After running that command
conda will show you the packages that will be downloaded,
and you can press enter to proceed with the installation.
If you want to answer yes by default and skip this confirmation step,
you can replace conda install with conda install -y.
Also note that we may occasionally need to install packages using pip, the standard Python package manager. The installation command is very similar to that of conda: pip install <package-name>.
In the next session
we will use conda to install
some of the key packages we will use in MDS.
JupyterLab setup
We will be using JupyterLab as our main coding environment
and pandas is one of the key data analyses packages in MDS.
The Jupytext Python package and the JupyterLab git extension facilitates
using notebooks in JupyterLab together with Git & GitHub.
The spellchecker helps us correcting typos in our writing.
Install them via the following commands:
conda install pandas jupyterlab jupyterlab-git jupyterlab-spellchecker jupytext otter-grader
If the above command fails, try installing a few packages at a time instead of all of them at once.
We will grade part of your assignments in MDS using the Otter-Grader package for your Jupyter-based assignments.
Note: You will also install Otter-Grader for R in the later sections of this guide.
To test that your JupyterLab installation is functional, you can type jupyter lab into a terminal,
which should open a new tab in your default browser with the JupyterLab interface.
To exit out of JupyterLab you can click File -> Shutdown,
or go to the terminal from which you launched JupyterLab and hold Ctrl while pressing c twice.
Note: we will use many more packages than those listed above across the MDS program, however we will manage these using virtual environments (which you will learn about in DSCI 521: Platforms for Data Science).
R, IRkernel, and RStudio
R is another programming language that we will be using a lot in the MDS program. We will use R both in Jupyter notebooks and in RStudio.
R
The version of R available in the default Ubuntu repositories is older than the one we use in MDS. To obtain the latest R packages, we need to add a new repository which is maintained directly by the r-project. To do this, first add the key for this repository by typing the following:
wget -qO- https://cloud.r-project.org/bin/linux/ubuntu/marutter_pubkey.asc | sudo tee -a /etc/apt/trusted.gpg.d/cran_ubuntu_key.asc
Then add the URL to the repository:
sudo add-apt-repository "deb https://cloud.r-project.org/bin/linux/ubuntu $(lsb_release -cs)-cran40/"
Next, install r-base and r-base-dev (useful for compiling R packages from source):
sudo apt install r-base r-base-dev
After installation, type the following in a new terminal window:
R --version
You should see something like this if you were successful:
R version 4.5.1 (2025-06-13) -- "Great Square Root"
Copyright (C) 2025 The R Foundation for Statistical Computing
Platform: x86_64-pc-linux-gnu (64-bit)
Note: See this page for additional instructions if you run into troubles while installing R.
Note: Although it is possible to install R through conda, we highly recommend not doing so. In case you have already installed R using conda you can remove it by executing
conda uninstall r-base.
RStudio
Download the Ubuntu 24 Desktop version (not Pro) of RStudio from https://posit.co/download/rstudio-desktop/. Open the file and follow the installer instructions.
Note: If you select “open with” and try to open the file directly with the Ubuntu Software app instead of downloading it first, the software app might complain that the file is not supported.
To see if you were successful, try opening RStudio by clicking on its icon or typing rstudio in a terminal. It should open and look something like this picture below:

Note: Since we installed RStudio directly from a deb file rather than from a repository or a snap package, it will not be updated when we run
sudo apt upgradeand not automatically as for snap packages. Instead, RStudio will notify you of any available updates when the program is launched.
Now we are going to change RStudio’s Insert Pipe shortcut so that it inserts the new native pipe operator |>.
Go to Tools > Global Options > Code > Editing and tick the following option:
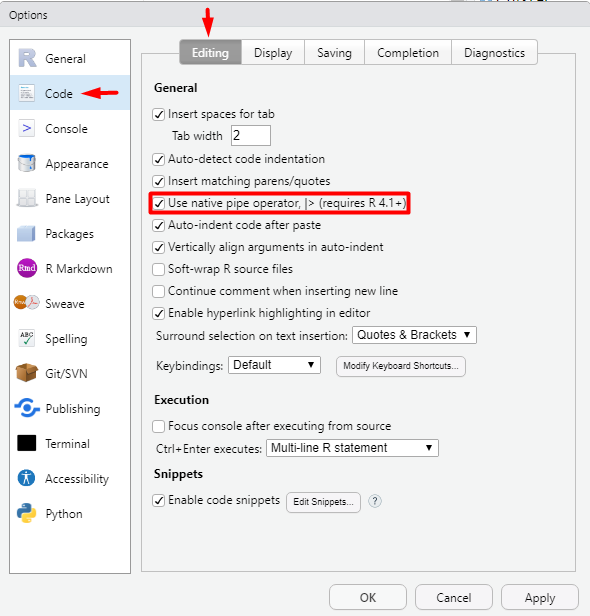
Once the change is made you can try in the RStudio console Ctrl + Shift + m to check if works. Close down RStudio afterwards.
Installing R packages
Some R packages (e.g. tidyverse and devtools) have external dependencies on Ubuntu outside of R. We need to install these first before we install such R packages:
sudo apt install libcurl4-openssl-dev libssl-dev libxml2-dev libfontconfig1-dev libharfbuzz-dev libfribidi-dev libtiff5-dev
Next, install the key R packages needed for the start of MDS program, by opening up RStudio again and typing the following into the R console inside RStudio (the first line might take a long time to run):
Note: If you are asked about installing into a personal library, select Yes.
Note: If you are asked to select a mirror, select the first
0-Cloudmirror.
install.packages('pak')
pak::pkg_install(c('tidyverse', 'renv', 'usethis', 'devtools', 'markdown', 'rmarkdown', 'languageserver', 'janitor', 'gapminder', 'readxl', "ucbds-infra/ottr", "ttimbers/canlang"))
Note: If you are asked to update packages during the installation via
devtools::install_github, select theNoneoption.
Stan
Stan is the language we will be using later on in the program for Bayesian statistics.
To install it open RStudio and install rstan
install.packages("StanHeaders", repos = c("https://stan-dev.r-universe.dev", getOption("repos")))
install.packages("rstan", repos = c("https://stan-dev.r-universe.dev", getOption("repos")))
Note: If you are asked to update packages during the installation via
devtools::install_github, select theNoneoption.
Test the installation with:
example(stan_model, package = "rstan", run.dontrun = TRUE)
The model should then compile and sample. Here’s a snippet of the output you should see:
SAMPLING FOR MODEL '16a540c6086086816528e4524def24d9' NOW (CHAIN 4).
Chain 4:
Chain 4: Gradient evaluation took 2e-06 seconds
Chain 4: 1000 transitions using 10 leapfrog steps per transition would take 0.02 seconds.
Chain 4: Adjust your expectations accordingly!
Chain 4:
Chain 4:
Chain 4: Iteration:    1 / 2000 [  0%]  (Warmup)
Chain 4: Iteration:  200 / 2000 [ 10%]  (Warmup)
Chain 4: Iteration:  400 / 2000 [ 20%]  (Warmup)
Chain 4: Iteration:  600 / 2000 [ 30%]  (Warmup)
Chain 4: Iteration:  800 / 2000 [ 40%]  (Warmup)
Chain 4: Iteration: 1000 / 2000 [ 50%]  (Warmup)
Chain 4: Iteration: 1001 / 2000 [ 50%]  (Sampling)
Chain 4: Iteration: 1200 / 2000 [ 60%]  (Sampling)
Chain 4: Iteration: 1400 / 2000 [ 70%]  (Sampling)
Chain 4: Iteration: 1600 / 2000 [ 80%]  (Sampling)
Chain 4: Iteration: 1800 / 2000 [ 90%]  (Sampling)
Chain 4: Iteration: 2000 / 2000 [100%]  (Sampling)
Chain 4:
Chain 4:  Elapsed Time: 0.003828 seconds (Warm-up)
Chain 4:                0.003417 seconds (Sampling)
Chain 4:                0.007245 seconds (Total)
Chain 4:
IRkernel
The IRkernel package is needed to make R work in Jupyter notebooks. To enable this kernel in the notebooks, install it and run the setup via the following two commands:
install.packages('IRkernel')
IRkernel::installspec()
Note: If you see an error message saying “jupyter-client has to be installed…”, close RStudio and run the following line from your terminal instead:
R -e "IRkernel::installspec()"
To see if you were successful, try running JupyterLab and check if you have a working R kernel. To launch JupyterLab, type the following in a terminal:
jupyter lab
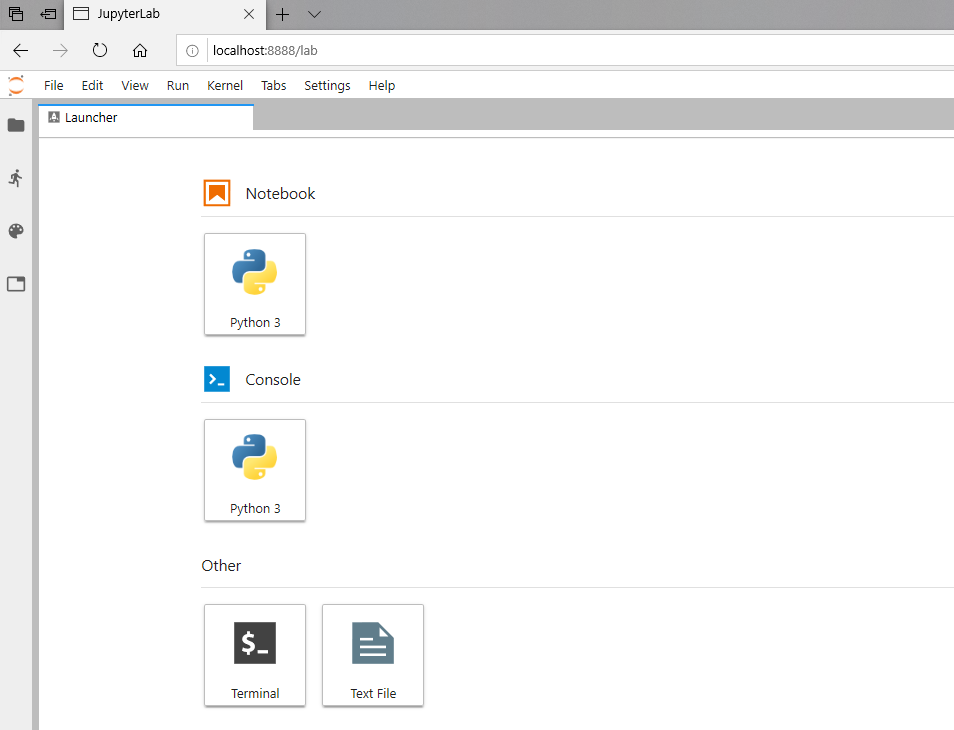
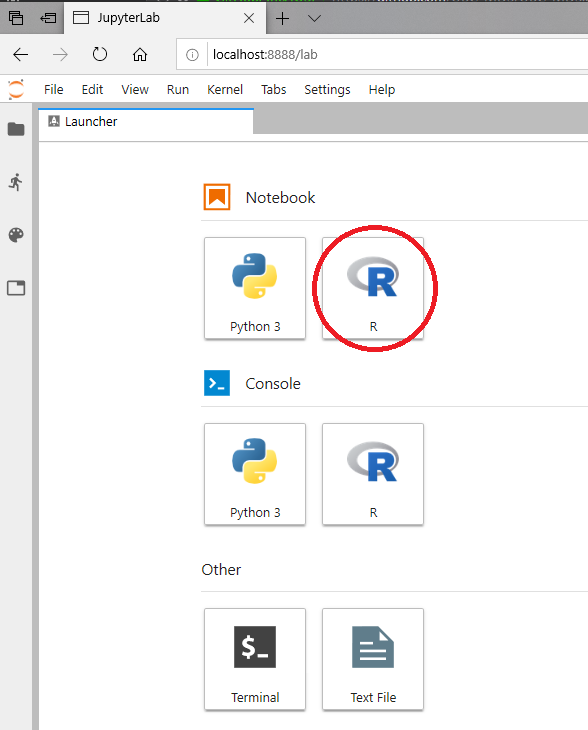
A browser should have launched and you should see a page that looks like the screenshot below. Now click on “R” notebook (circled in red on the screenshot below) to launch an JupyterLab with an R kernel.
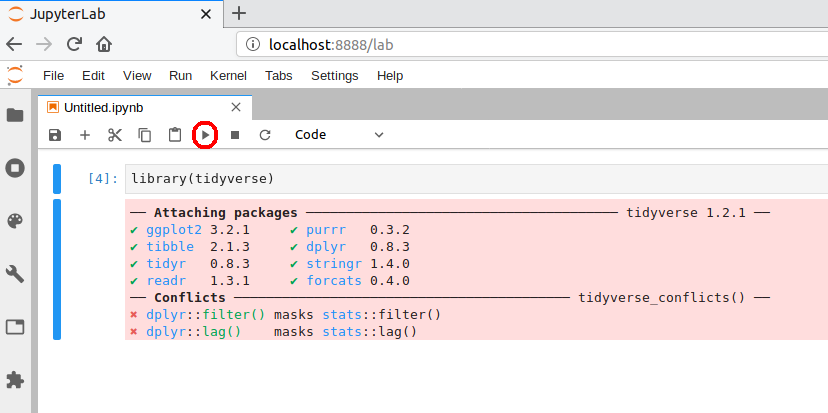
Sometimes a kernel loads, but doesn’t work as expected. To test whether your installation was done correctly now type library(tidyverse) in the code cell and click on the run button to run the cell. If your R kernel works you should see something like the image below:
Note: It might take a long time to open JupyterLab when there is an R kernel notebook open since the previous session. Be patient and wait several seconds for JupyterLab to start the R kernel.
To improve the experience of using R in JupyterLab,
we will add keyboard shortcuts for inserting the common R operators <- and |>.
Go to Settings -> Settings Editor. Then click JSON Settings Editor in the top right corner and click on Keyboard Shortcuts in the navigation panel to the left.
You will see two panels,
the right-most “User Preferences” panel allows you to perform advanced modification
of keyboards shortcuts in JupyterLab.
It should be empty.
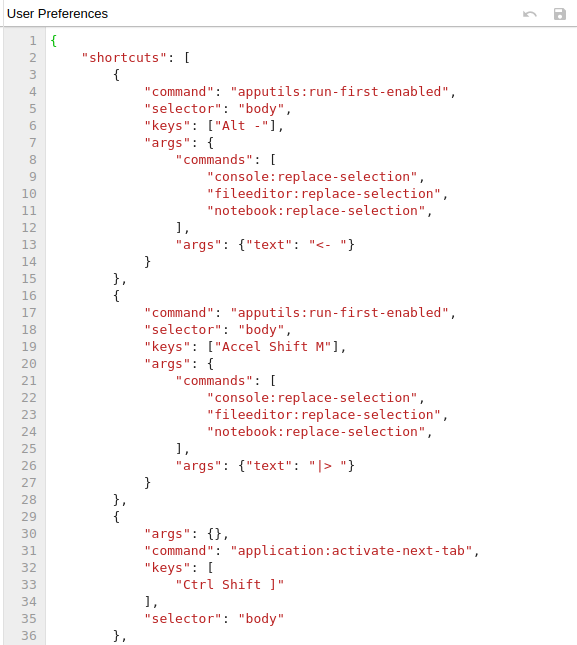
We’re going to add two more shortcuts,
by pasting a text snippet just before the first existing shortcut.
{
    "shortcuts":[
        {
            "command": "apputils:run-first-enabled",
            "selector": "body",
            "keys": ["Alt -"],
            "args": {
                "commands": [
                    "console:replace-selection",
                    "fileeditor:replace-selection",
                    "notebook:replace-selection",
                ],
                "args": {"text": "<- "}
            }
        },
        {
            "command": "apputils:run-first-enabled",
            "selector": "body",
            "keys": ["Accel Shift M"],
            "args": {
                "commands": [
                    "console:replace-selection",
                    "fileeditor:replace-selection",
                    "notebook:replace-selection",
                ],
                "args": {"text": "|> "}
            }
        }
    ]
}
After you have pasted this text,
hit the small floppy disk in the top right (or Ctrl + s)
to save the settings.
Here is a screenshot of what it looks like with the settings saved:
To check that the extension is working,
open JupyterLab,
launch an R notebook,
and try inserting the operators by pressing Alt + - or Shift + Ctrl + m, respectively.
You could add any arbitrary text insertion command the same way,
but this is all that is required for MDS.
Quarto CLI
Quarto is an open-source scientific and technical publishing system that you can access from VSCode, Jupyter Lab, RStudio, or the terminal.
The RStudio version that you have downloaded is already equipped with the last version of Quarto. You can check this by opening a new document in File -> New File -> Quarto Document.
Quarto can be used outside RStudio as well, this is why we are going to install Quarto CLI. Please, download the last version of Quarto CLI for Linux.
After the installation finishes, close all the terminals you may have open. Then, open a new one and try running this command:
quarto --version
If the installation was successful you will read the output with the latest quarto version.
LaTeX
We will install the lightest possible version of LaTeX and it’s necessary packages as possible so that we can render Jupyter notebooks and R Markdown documents to html and PDF. If you have previously installed LaTeX, please uninstall it before proceeding with these instructions.
First, open RStudio and run the following commands to install the tinytex package and setup tinytex:
install.packages('tinytex')
tinytex::install_tinytex()
As recommended at the end of the installation, it is important to log out and in again for TinyTex to work properly (restarting the computer also works). Once you log back in, try running the following in a terminal:
latex --version
You should see something like this if you were successful:
pdfTeX 3.141592653-2.6-1.40.28 (TeX Live 2025)
kpathsea version 6.4.1
Copyright 2025 Han The Thanh (pdfTeX) et al.
There is NO warranty.  Redistribution of this software is
covered by the terms of both the pdfTeX copyright and
the Lesser GNU General Public License.
For more information about these matters, see the file
named COPYING and the pdfTeX source.
Primary author of pdfTeX: Han The Thanh (pdfTeX) et al.
Compiled with libpng 1.6.46; using libpng 1.6.46
Compiled with zlib 1.3.1; using zlib 1.3.1
Compiled with xpdf version 4.04
The above is all we need to have LaTeX work with R Markdown documents, however for Jupyter we need to install several more packages. To install the additional LaTeX packages needed for Jupyter paste the following into the new terminal instance and press enter:
tlmgr install eurosym \
  adjustbox \
  caption \
  collectbox \
  enumitem \
  environ \
  fp \
  jknapltx \
  parskip \
  pdfcol \
  pgf \
  rsfs \
  soul \
  tcolorbox \
  titling \
  trimspaces \
  ucs \
  ulem \
  upquote \
  lwarp \
  oberdiek
To test that your latex installation is working with Jupyter notebooks,
launch jupyter lab from the terminal where you confirmed that latex works
and open either a new notebook
or the same one you used to test IRkernel above.
Go to File -> Save and Export Notebook as... -> PDF.
If the PDF file is created,
your LaTeX environment is set up correctly.
WebPDF export
Jupyter recently added another way to export notebooks to PDF which does not require Latex and makes the exported PDF look similar to notebooks exported to HTML. This requires the an additional package, which we can install as follows.
pip install "nbconvert[webpdf]"
playwright install chromium
Now you can try exporting by going to
File -> Save and Export Notebook As... -> WebPDF.
PostgreSQL
We will be using PostgreSQL as our database management system. Install it via the following command:
sudo apt install postgresql
Note: Older version of Ubuntu might not have the latest version of PostgreSQL in the repos. If this is the case for your version you need to follow the instructions in the PostgreSQL documentation to first add the their repository and then install the latest version.
By default, this installation creates a new user called postgres,
which is the only one with permission to open the databases.
We will see how to set this up for other users later in the program,
but for now run the following to confirm that your installation was successful:
sudo su -c psql postgres
The above should yield the prompt to change to what is shown below (the exact minor version does not matter as the major version is 16):
psql (16.9 (Ubuntu 16.9-0ubuntu0.24.04.1))
Type "help" for help.

postgres=#
Note: To exit from Postgres type
exit, or pressctrl+d.
Docker
You will use Docker to create reproducible, sharable and shippable computing environments for your analyses. For this you will need a Docker account. You can sign up for a free one here.
After signing-up, you also need to install Docker CE for Ubuntu. Install the stable version by following the installation instructions using the “Install using the repository” methods found here, including the subheadings “Set up the repository” and “Install the Docker packages”.
Next, follow the Linux post installation steps here so that you can run Docker without typing sudo
(only the subheading “Managing docker as a non-root user”).
Confirm that docker is working by following the verification instructions on that same page.
VS Code extensions
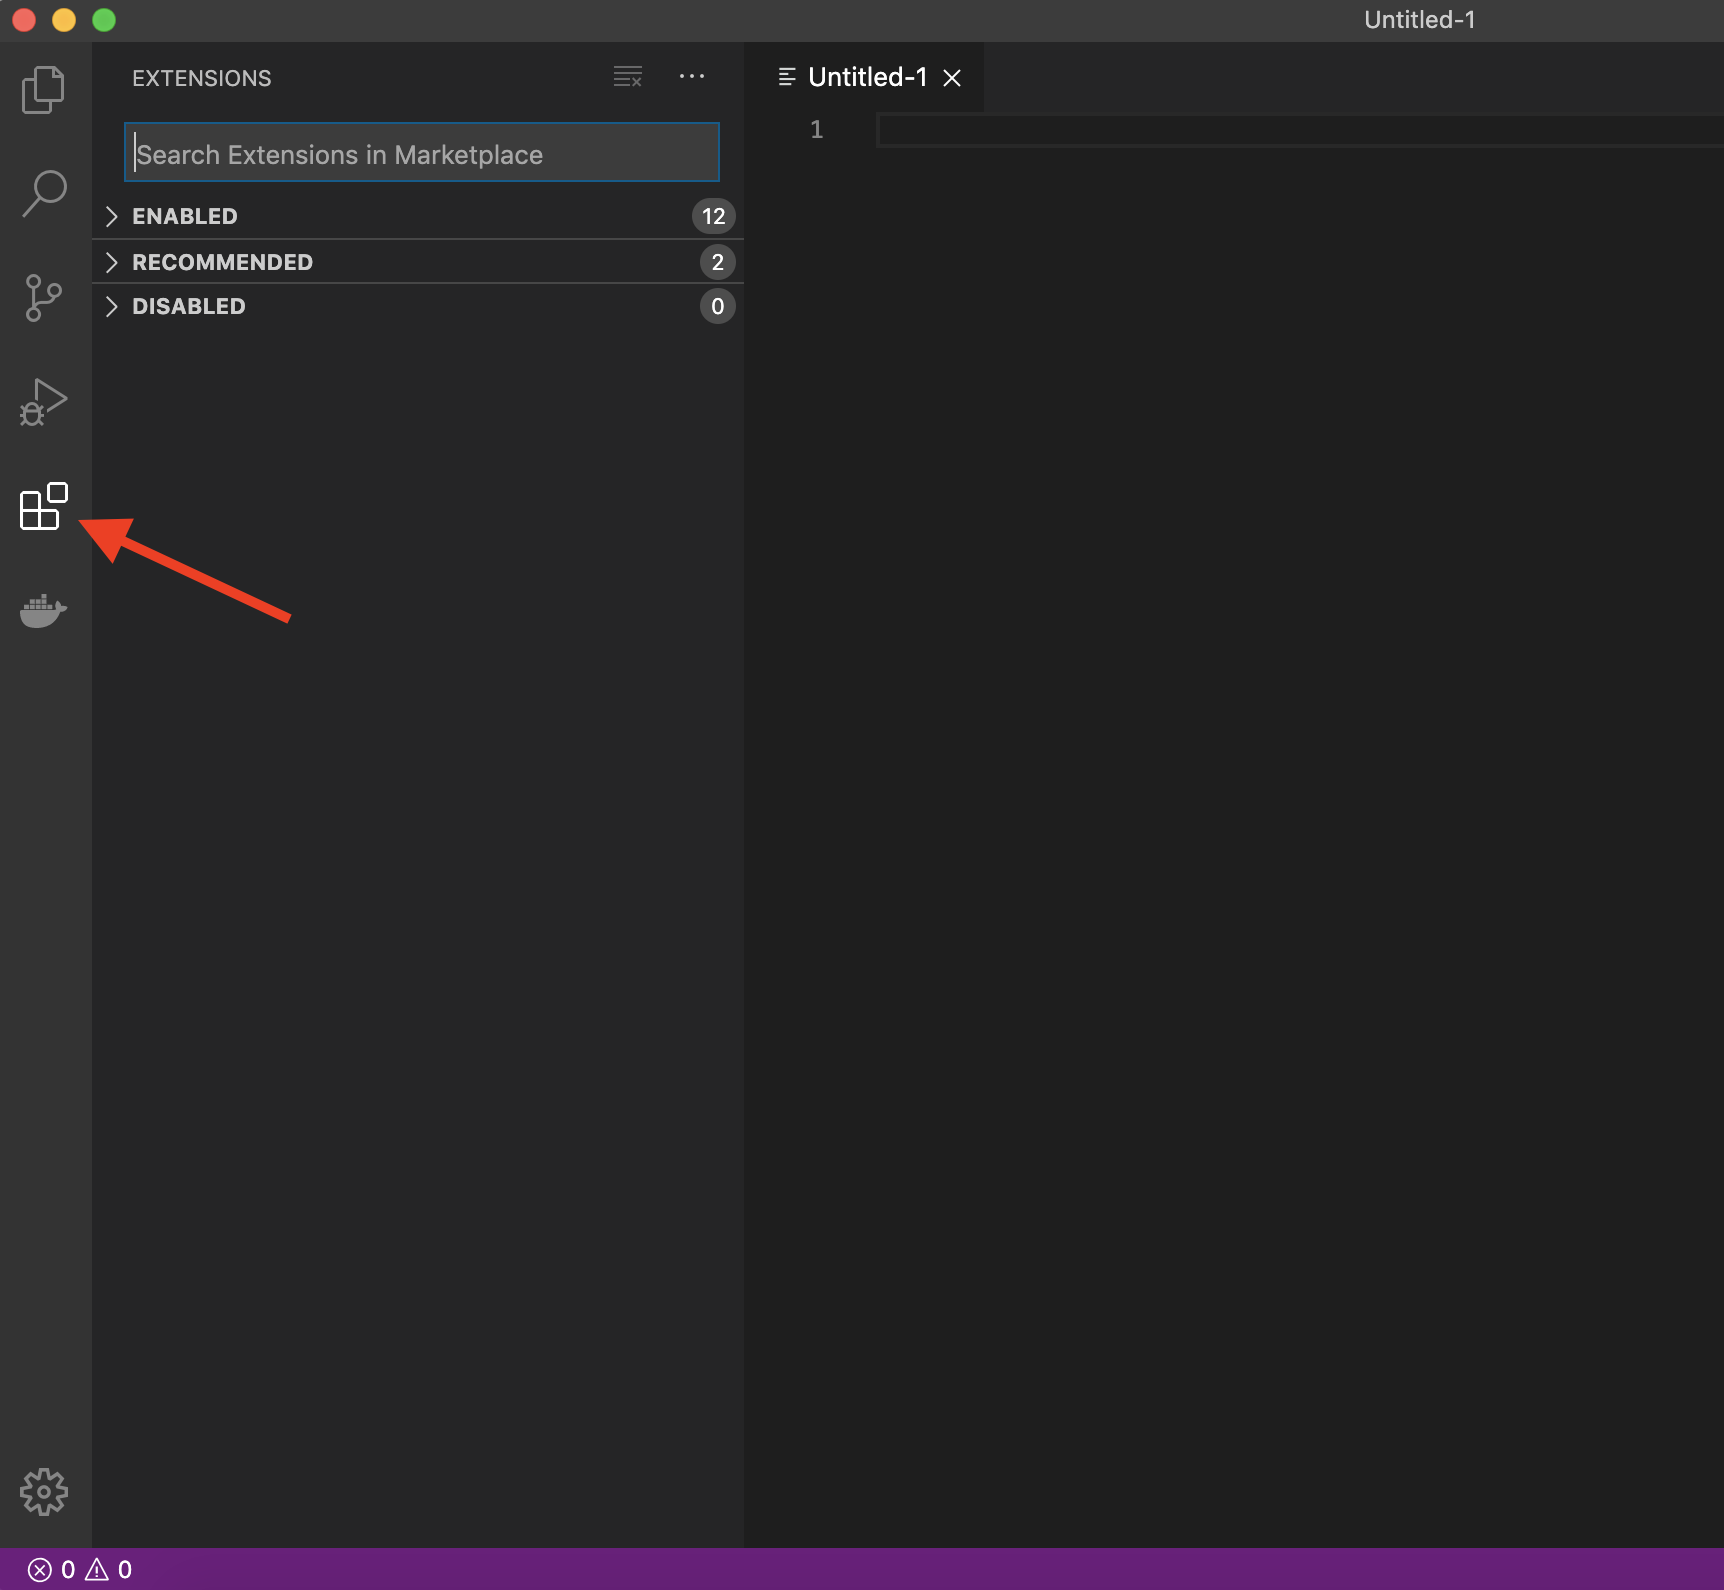
The real magic of VS Code is in the extensions that let you add languages, debuggers, and tools to your installation to support your specific workflow. From within VS Code you can open up the Extension Marketplace (read more here) to browse and install extensions by clicking on the Extensions icon in the Activity Bar indicated in the figure below.
To install an extension, you simply search for it in the search bar, click the extension you want, and then click “Install”. There are extensions available to make almost any workflow or task you are interested in more efficient! Here we are interested in setting up VS Code as a Python IDE. To do this, search for and install the following extensions:
- Python (everything Python: notebooks, debugging, linting, formatting, etc.)
- markdownlint (markdown linting and style checking extension)
- GitLens (powerful extension that extends VS Code’s native git capabilities)
- Git History (intutive view of your git history)
- Docker (easily use Docker from VS Code)
- (Optional) Material Theme and/or Predawn Theme Kit (additional colour themes to choose from)
- (Optional) Material Icon Theme (great-looking custom file icons!)
This video tutorial is an excellent introduction to using VS Code in Python.
Improving the bash configuration
To improve your experience using bash, we recommend appending a few lines to the end of your bash configuration file. These make it easier to use the TAB key for autocompletion improves how bash handles the command history, and the appearance of the terminal (we will talk more about these topics during class). It also adds colors to the terminal’s text, which can make it easier to navigate visually. First, run the following command to download a script that always shows information about git in the terminal prompt:
curl -Sso ~/.git-prompt.sh https://raw.githubusercontent.com/git/git/master/contrib/completion/git-prompt.sh
Then open the bash configuration file:
code ~/.bashrc
Paste the following at the end of the file (make sure not to overwrite any existing lines) and save it afterwards:
# Load the git prompt script
source ~/.git-prompt.sh
# Show unstaged (*) and staged (+) changes in the prompt string
export GIT_PS1_SHOWDIRTYSTATE=1

# Color the prompt string and add git info
export PS1=${CONDA_PROMPT_MODIFIER}'\[\033[01;32m\]\u@\h\[\033[01;34m\] \w\[\033[33m\]$(__git_ps1 " (%s)")\[\033[00m\]\n\$ '

# TAB completion configuration
# TAB completion ignores case
bind "set completion-ignore-case on"
# Require only one instead of two TAB presses before showing matches
bind "set show-all-if-ambiguous on"
# If there are multiple matches for completion, cycle through them with TAB
bind 'TAB':menu-complete
# Perform partial completion on the first Tab press,
# only start cycling full results on the second Tab press
bind "set menu-complete-display-prefix on"

# History configuration
# Cycle through history based on characters already typed on the line
bind '"\e[A":history-search-backward'
bind '"\e[B":history-search-forward'
# Append to the history file, don't overwrite it.
shopt -s histappend
# Write commands to history one-by-one right after they are executed
# instead of all together when the terminal is closed.
# Make new terminals see all commands run in currently open terminals and
# prepend a newline to the prompt string to separate it from the last command's output
PROMPT_COMMAND='history -a; echo'
# Increase history size
HISTSIZE=50000
HISTFILESIZE=50000

# Aliases and functions
# Note that aliases only are in effect when you are using the shell interactively
# (e.g. opening the terminal and typing or pasting commands).
# If you run a bash script or makefile,
# the original command is used instead of your alias.
# ---
# MDS help script
alias mds-help='bash ~/.mds-help.sh'
# Some common operations
alias l='ls -lthAF'
alias jl='jupyter lab'
alias ca='conda activate'
alias gl='git log --date short -10 --pretty=format:"%C(auto,yellow)%h %C(auto,blue)%ad%C(auto)%d %C(auto,reset)%s"'
alias gt='git status'
alias gm='git commit -m'
alias gap='git add -p'
# Move, remove, and copy show what was done and prompt before overwriting files.
alias rm="rm -vI"
alias mv="mv -vi"
alias cp="cp -vi"
alias mkdir="mkdir -vp"
# Case insensitive grep by default
alias grep='grep -i'
Finally, download and save the MDS help script via the following command.
curl -Sso ~/.mds-help.sh https://raw.githubusercontent.com/UBC-MDS/UBC-MDS.github.io/master/resources_pages/mds-help.sh
Open a new terminal and type mds-help,
your terminal should display
the most important terminal commands we will be learning in MDS.
You don’t need to memorize these now,
just remember that if you ever forget how to do something with bash, git or conda,
you can type mds-help in your terminal
and use it as a reference.
Post-installation notes
You have completed the installation instructions, well done 🙌! We have created a script to help you check that your installation was successful, and to provide instructions for how you can troubleshoot any issues. To run this script, please execute the following command from your terminal.
bash <(curl -Ss https://raw.githubusercontent.com/UBC-MDS/UBC-MDS.github.io/master/resources_pages/check-setup-mds.sh)
```

The output from running the script will look something like this:

```
# MDS setup check 2025.1

If a program or package is marked as MISSING,
this means that you are missing the required version of that program or package.
Either it is not installed at all or the wrong version is installed.
The required version is indicated with a number and an asterisk (*),
e.g. 4.* means that all versions starting with 4 are accepted (4.0.1, 4.2.5, etc).

You can run the following commands to find out which version
of a program or package is installed (if any):
```
name_of_program --version  # For system programs
conda list  # For Python packages
R -q -e "as.data.frame(installed.packages()[,3])"  # For R packages
```

Checking program and package versions...

## Operating system
Operating System: Ubuntu 24.04.1 LTS
Architecture:     x86-64
Kernel:           Linux 6.6.87.2

## System programs
OK        psql
OK        rstudio 2025.05.1+513
OK        R 4.5.1 (2025-06-13) -- "Great Square Root"
OK        python 3.12.11
OK        conda 25.7.0
OK        bash 5.2.21(1)-release (x86_64-pc-linux-gnu)
OK        git 2.43.0
OK        make 4.3
OK        latex 3.141592653-2.6-1.40.28 (TeX Live 2025)
OK        tlmgr 5204 (2025-05-13 23:48:24 +0200)
OK        docker 28.3.3, build 980b856
OK        code 1.99.0
OK        quarto 1.7.33

## Python packages
OK        otter-grader=6.1.3
OK        pandas=2.3.1
OK        nbconvert-core=7.16.6
OK        playwright=1.54.0
OK        jupyterlab=4.4.5
OK        jupyterlab-git=0.51.2
OK        jupyterlab-spellchecker=0.8.4
OK        jupyterlab PDF-generation was successful.
OK        jupyterlab WebPDF-generation was successful.
OK        jupyterlab HTML-generation was successful.

## R packages
OK        tidyverse=2.0.0
OK        markdown=2.0
markdown=2.29
OK        rmarkdown=2.29
OK        renv=1.1.5
OK        IRkernel=1.3.2
OK        tinytex=0.57
OK        janitor=2.2.1
OK        gapminder=1.0.1
OK        readxl=1.4.5
OK        ottr=1.5.2
OK        canlang=0.0.1
OK        rmarkdown PDF-generation was successful.
OK        rmarkdown HTML-generation was successful.

The above output has been saved to the file /home/user/check-setup-mds.log
together with system configuration details and any detailed error messages about PDF and HTML generation.
You can open this folder in your file browser by typing `xdg-open .` (without the surrounding backticks).
Before sharing the log file, review that there is no SENSITIVE INFORMATION such as passwords or access tokens in it.
As you can see at the end of the output, a log file is saved in your current directory. We might ask you to upload this file if we need to troubleshoot your installation, so that we can help you more effectively. If any of your packages are marked as “MISSING” you will need to figure out what is wrong and possibly reinstall them. Once all packages are marked as “OK” we will ask you to submit this log file, so that we can confirm that your installation was successful. Details on where to submit will be provided later.
Note: In general you should be careful running scripts unless they come from a trusted source as in this case (just like how you should be careful when downloading and installing programs on your computer).
Positron (Optional)
You may also opt to install Positron. It’s a VS Code Fork that works well with Python and R for data science tasks. This is not required for the course, but you may see a few instructors use it.
To download Positron, you can follow the link here:
https://positron.posit.co/start.html
You do not need to follow any of the Python or R setup instructions (we have already done that)
Attributions
- Harvard CS109
- UBC STAT 545 licensed under the CC BY-NC 3.0.
- Software Carpentry