Table of Contents
- Installation notes
- UBC Student Email
- Web browser
- Password manager
- Slack
- UBC cloud computing resources
- Positron
- GitHub
- Git, Bash, and Windows Terminal
- Quarto CLI
- Pandoc
- Python and uv
- R, Rtools, and RStudio
- Make
- LaTeX and PDF export
- PostgreSQL
- Docker
- Improving the bash configuration
- Post-installation notes
- Visual Studio Code (optional)
- Attributions
Installation notes
If you have already installed Git, Latex, Make, or any of the R or Python related packages please uninstall these and follow the instructions below to reinstall them (make sure to also remove any user configuration files and backup them if desired). In order to be able to support you effectively and minimize setup issues and software conflicts, we require all students to install the software stack the same way.
For Python in particular there is a script that reports everything already installed on your machine, so you do not have to hunt for it yourself. You will run it as part of the Python and uv section below.
In all the sections below, if you are presented with the choice to download either a 64-bit (also called x64) or a 32-bit (also called x86) version of the application always choose the 64-bit version.
Once you have completed these installation instructions, make sure to follow the post-installation notes at the end to check that all software is setup correctly.
UBC Student Email
Please sign up for a UBC Student Email. This account will also grant you access to a range of UBC services, including Microsoft Teams and OneDrive. To do so navigate to https://it.ubc.ca/services/email-voice-internet/ubc-student-email-service and follow the instructions under “Get Started”.
Web browser
In MDS we will be using many tools that work most reliably on Google Chrome and Firefox (including our online quiz software), so we recommend that you use one of these browsers.
- To install Chrome, go to https://www.google.com/chrome/, click on “Download Chrome” and follow the instructions on the website to finish the installation.
- To install Firefox, go to https://www.firefox.com/, click on “Download Firefox” and follow the instructions on the website to finish the installation.
Password manager
A password manager is an efficient and convenient measure to protect your online accounts from most common threats. While you don’t strictly need to use one for any of the courses in MDS, we highly recommend that you set one up for your own benefit. Examples of reliable password managers include the ones built into Chrome and Firefox, as well as Bitwarden, and KeePassXC (if you prefer to sync your passwords manually).
Slack
For MDS program announcements, course forums, and correspondence we use the communication tool Slack. Slack can be accessed via the web browser, but we recommend using the Slack app, which can be installed via downloadable file from the slack website https://slack.com/downloads/windows.
UBC cloud computing resources
If you at any point during the MDS program are having an issue with your computer, such as not being able to install all the software before the start of the program, it is useful to know UBC offers a free online computing environment that you can use as a backup to follow along in most of the MDS courses. This is called Jupyter Open and you can access it by logging into https://open.jupyter.ubc.ca/ with your UBC CWL. Jupyter Open allow you to work with JupyterLab, R, Python, and Bash, and you can install packages there as well (these are all explained further down in the installation instructions and during the program).
Positron
Positron is the code editor we will be using throughout the MDS program. It is built specifically for data science and has support for both Python and R built in, including a console, a variables pane, and an editor for Jupyter notebooks.
Go to https://positron.posit.co/download.html
and download the Windows x64 System install package.
This is the one that installs Positron under C:\Program Files for everyone who uses the computer,
which is how we install all of the tools in these instructions,
so the installer will ask you for administrator credentials.
After the download has finished, run the installer and accept the default configuration
for all pages except for the following:
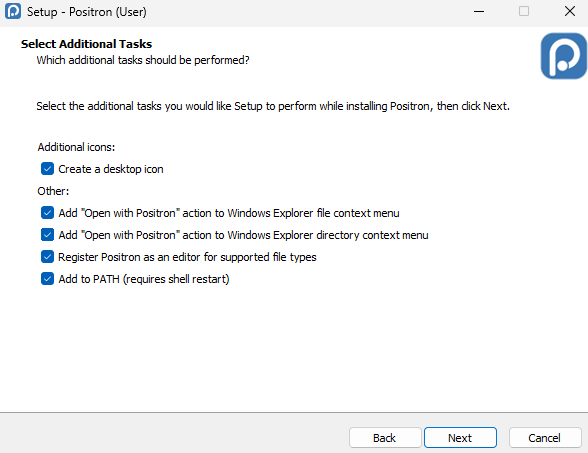
- Optional On the Select Additional Tasks page, check “Create a desktop icon” under “Additional icons”.
- Also on the Select Additional Tasks page, check both of these under “Other”, which are not selected by default:
- Add “Open with Positron” action to Windows Explorer file context menu
- Add “Open with Positron” action to Windows Explorer directory context menu
- Leave the remaining two boxes under “Other” checked, as they already are by default:
- Register Positron as an editor for supported file types
- Add to PATH (requires shell restart) — we need this one so that Positron can be opened from the terminal later on
The Select Additional Tasks page should look like this once all of those boxes are checked:
Note: Positron requires the latest Microsoft Visual C++ Redistributable. If Positron does not start after installing, install the redistributable and then try again.
We will check that this worked from the terminal in the next section, once the terminal itself is installed.
Note: You do not need to install any extensions for Python, R, or Quarto. Positron already includes support for all three.
Note: The first time you open Positron it may tell you that no interpreters were found. That is expected at this stage — we install Python and R further down these instructions. Once they are installed, Positron finds R automatically, and it finds Python by looking for a
.venvfolder inside whichever project folder you open.
GitHub
In MDS we will use the publicly available GitHub.com as well as an Enterprise version of GitHub hosted here at UBC, GitHub.ubc.ca. Please follow the set-up instructions for both below.
Important: These are two completely separate GitHub instances. They have separate accounts, separate usernames, and separate repositories, and signing in to one does not sign you in to the other.
- GitHub.ubc.ca is UBC’s own installation. Your account there is created for you and you sign in with your UBC CWL, so there is no username for you to choose.
- GitHub.com is the public one. It is your professional profile, and it stays with you after the program ends.
GitHub.com
Sign up for a free account at GitHub.com if you don’t have one already.
If you do already have a GitHub.com account, use that same account for MDS. We recommend not creating a new one just for the program, since this is the account that builds up your public work over time.
GitHub.ubc.ca
To add you to the MDS organization on Github.ubc.ca we need you to follow the instructions below:
Note: this typically does not work until orientation starts. If you get to orientation and this still does not work, please let us know. It is safe to skip just this until then but please complete all other steps
- navigate to https://activate.github.ubc.ca and login with your CWL to setup their access
- wait 20 minutes
- login to Github.ubc.ca using your CWL credentials
This step is required for
- being able to store your work
- all homework submission and grading
- working collaboratively
Git, Bash, and Windows Terminal
Although these three are separate programs, we are including them in the same section here since they are related and used together on Windows. Briefly, we will be using the Bash shell to interact with our computers via a command line interface, Git to keep a version history of our files and upload to/download from to GitHub, and Windows Terminal to run both Bash and Git.
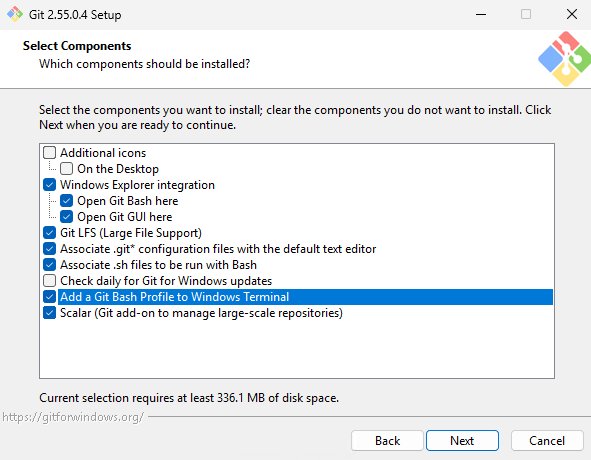
Go to https://git-scm.com/download/win and download the 64-bit Git for Windows Setup (this installer also includes Bash and we will refer to it as Git Bash). After the download has finished, run the installer and accept the default configuration for all pages except for the following:
On the Select Components page, add a Git Bash profile to Windows Terminal.
On the Choosing the default editor used by Git page, pick whichever editor you prefer from the drop-down menu. “Use the Nano editor by default” is a good simple choice, and Visual Studio Code is also in the list if you already use it.
- Positron is not one of the options offered on this page, so whatever you pick here we will set Positron as Git’s editor ourselves in the “Setting Positron as the default editor” step below
Set the default branch name to
main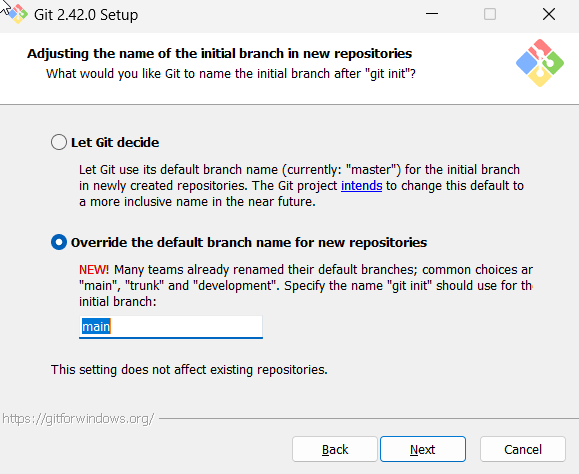
For the remaining screens, keep whichever option is already selected. In a current installer those are:
- Adjusting your PATH environment: Git from the command line and also from 3rd-party software
- Choosing the SSH executable: Use bundled OpenSSH
- Choosing HTTPS transport backend: Use the native Windows Secure Channel library
- Configuring the line ending conversions: Checkout Windows-style, commit Unix-style line endings
- Configuring the terminal emulator to use with Git Bash: Use MinTTY (the default terminal of MSYS2)
- Choose the default behavior of ‘git pull’: Merge (older installers called this option “Fast-forward or merge”)
- Choose a credential helper: Git Credential Manager
- Configuring extra options: Enable file system caching
- You can also choose to “Enable symbolic links”
- Configuring experimental options: leave it unchecked
Windows Terminal comes preinstalled on Windows 11,
so you can open it from the Start menu by searching for “Terminal”.
On Windows 10, or if it is missing for any other reason,
install it from the Microsoft Store first.
In the top of the window,
you will see the tab bar with one open tab,
a plus sign,
and a down arrow.
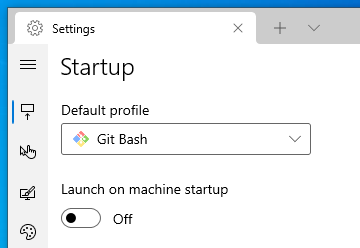
Click the down arrow and select Settings
(or type the shortcut Ctrl + ,).
In the Startup section,
click the dropdown menu under Default profile
and select Git Bash.
You can now launch the Windows terminal from the start menu
or pin it to the taskbar like any other program
(you can read the rest of the article linked above for additional tips if you wish).
To make sure everything worked,
close down Windows Terminal,
and open it again.
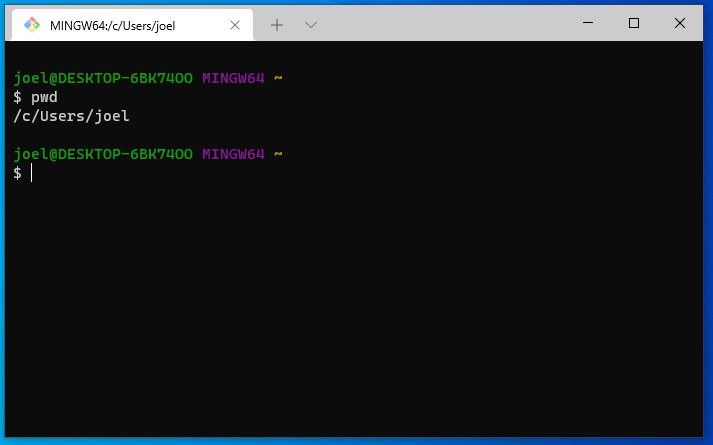
Git Bash should open by default,
the text should be green and purple,
and the tab should read MINGW64:/c/Users/$USERNAME
(you should also see /c/Users/$USERNAME if you type pwd into the terminal).
This screenshot shows what it should look like:
Note: Whenever we refer to “the terminal” in these installation instructions, we want you to use the Windows Terminal that you just installed with the Git Bash profile. Do not use Windows PowerShell, CMD, or anything else unless explicitly instructed to do so.
To open a new tab you can click the plus sign or use Ctrl + Shift + t
(you can close a tab with Ctrl + Shift + w).
To copy text from the terminal,
you can highlight it with the mouse and then click Ctrl + Shift + c.
To paste text you use Ctrl + Shift + v,
try it by pasting the following into the terminal
to check which version of Bash you just installed:
bash --version
The output should look similar to this:
GNU bash, version 5.2.37(1)-release (x86_64-pc-msys)
Copyright (C) 2022 Free Software Foundation, Inc.
License GPLv3+: GNU GPL version 3 or later <https://gnu.org/licenses/gpl.html>

This is free software; you are free to change and redistribute it.
There is NO WARRANTY, to the extent permitted by law.
Note: If there is a newline (the
entercharacter) in the clipboard when you are pasting into the terminal, you will be asked if you are sure you want to paste since this newline will act as if you pressedenterand run the command. As a guideline you can pressPaste anywayunless you are sure you don’t want this to happen.
Let’s also check which version of git was installed:
git --version
git version 2.55.0.windows.1
Note: You can launch many Windows programs from the terminal. For example, to launch Positron that we installed previously, you would type
positron. Let’s use this to check the version of Positron that we installed:
positron --version
You should see something like this if you were successful (the exact versions and hash will differ):
Positron: 2026.08.0 build 331
Positron SHA: a3a370d4187484ce962794408c76dab702978eaf
Code OSS: 1.124.0
Arch: x64
Note: If you get
positron: command not found, the installer’s “Add to PATH” option was most likely unchecked. See the Positron documentation on adding it to your path, then close all terminal windows and open a new one.
Configuring Git user info
Next, we need to configure Git by telling it your name and email. To do this type the following into the terminal (replacing Jane Doe and janedoe@example.com, with your name and email (the same used to sign up for GitHub), respectively):
git config --global user.name "Jane Doe"
git config --global user.email janedoe@example.com
Note: to ensure that you haven’t made a typo in any of the above, you can view your global Git configurations by either opening the configuration file in a text editor (e.g. via the command
positron ~/.gitconfig) or by typinggit config --list --global.
Setting Positron as the default editor
To make programs run from the terminal (such as git) use Positron by default, we will modify ~/.bash_profile. First, open it using Positron (this will also create the file if it doesn’t already exist):
positron ~/.bash_profile
Note: If you see any existing lines in your
~/.bash_profilerelated to a previous Python or R installation, please remove these.
Append the following lines:
# Set the default editor for programs launched from the terminal
export EDITOR="positron --wait"
export VISUAL="$EDITOR"  # Use the same value as for "EDITOR" in the line above
Then save the file and close the Positron window.
Note: Most terminal programs will read the
EDITORenvironmental variable when determining which editor to use, but some readVISUAL, so we’re setting both to the same value.
Positron was not one of the options in the Git installer, so we also need to register it as Git’s editor explicitly. This replaces whichever editor you chose during the installation. Run the following from your terminal:
git config --global core.editor "positron --wait"
On Windows,
programs launched from the terminal sometimes read a different configuration file than Git Bash.
To avoid this,
open your ~/.bashrc file:
positron ~/.bashrc
And append the following lines:
# Do NOT add anything to this file, use `~/.bash_profile` instead.
# The next line automatically loads your `~/.bash_profile`
# any time a program tries to read your `~/.bashrc` file.
if [ -f ~/.bash_profile ]; then . ~/.bash_profile; fi
The comment is a reminder to your future self who might open up this file a few months from now =)
Setting Git Bash as the default terminal profile in Positron
Finally, let’s make sure that Positron uses our newly installed Git Bash shell as its default terminal profile:
- Open up Positron and go to the general preferences / settings (shortcut
Ctrl+,). - Type in “Default terminal profile” and find the entry that reads
Terminal > Integrated > Default profile: Windows. - Select Git Bash from the drop down menu of this entry.
Now Git Bash should be opened automatically each time you open a new terminal inside Positron.
Quarto CLI
Quarto is an open-source scientific and technical publishing system. In MDS it is how you will turn notebooks and reports into PDF and HTML documents, and you can use it from Positron, JupyterLab, RStudio, or the terminal.
Download the latest version of Quarto CLI for Windows and run the installer, accepting the default configuration. If you are asked who to install it for, choose all users rather than just yourself.
Note: RStudio, which we install further down these instructions, comes with its own bundled copy of Quarto. That copy is not necessarily the most recent release, which is why we install the Quarto CLI separately here.
After the installation finishes, close all the terminals you may have open, then open a new one and run:
quarto --version
You should see something like this if you were successful (the exact version will differ):
1.10.3
Pandoc
Pandoc is the program that converts documents from one format
into another. JupyterLab and R Markdown both call it when they export to PDF,
so it has to be installed and on your PATH.
Note: Quarto ships with its own private copy of pandoc and does not need this one. This install is for the other two export routes.
Go to the pandoc installation page
and click the download button.
It takes you to pandoc’s releases page on GitHub rather than downloading anything directly,
so scroll down to the “Assets” list at the bottom of that page
and click the file whose name ends in -windows-x86_64.msi,
for example pandoc-3.10.2-windows-x86_64.msi.
Open the downloaded file and follow the installer.
If you are asked who to install it for, choose all users rather than just yourself.
The .msi adds pandoc to your PATH for you,
so there is nothing to add to your bash configuration file.
Close all open Git Bash windows, open a new one, and check that it worked:
pandoc --version
You should see something like this, with a version of 3.10 or newer:
pandoc 3.10.2
Features: +server +lua
Note: RStudio and Positron each bundle a copy of pandoc as well, so you may end up with more than one on your computer. That is expected and harmless. The one you just installed is the one your terminal will use.
Python and uv
Everything below is typed into Git Bash, the terminal you installed earlier. You will not need PowerShell, the Command Prompt, or an Anaconda Prompt at any point in MDS.
Note: Earlier versions of these instructions used Miniforge and
conda. If you find MDS material anywhere that tells you to runconda install, it is out of date — ignore it.
Checking for Python installations you already have
Many people arrive with Python already installed a few different ways, from a previous course or from teaching themselves. Windows makes this especially easy to end up with, because it offers to install Python for you from the Microsoft Store. Those copies can get in each other’s way, so before installing anything new it is worth seeing what is already there.
Run the following in Git Bash:
bash <(curl -Ssf https://ubc-mds.github.io/mds-setup-check/check-python-installs.sh)
This only looks and reports — it does not change or remove anything. It prints what it finds in up to three groups: things it recommends removing (conda installations — MDS has moved off conda entirely), things likely to cause confusion later that you can safely leave alone, and things worth fixing regardless. If nothing needs your attention, it says so and prints nothing else. Where it suggests a clean-up, it gives you the exact command to run yourself.
Note: This report is informational. uv will work even if you change nothing at all. If you are not sure about an item, leave it and bring the output to a TA.
Installing uv
Install uv by running this in Git Bash:
curl -LsSf https://astral.sh/uv/install.sh | sh
The installer adds uv to your PATH by editing your ~/.bash_profile,
so close all open terminals and open a new one before continuing.
Then check that it worked:
uv --version
You should see something like this if you were successful:
uv 0.12.3
Note: If you get
bash: uv: command not foundin a brand new terminal, your bash configuration file is not being read. You can get going again in the current terminal by runningsource $HOME/.local/bin/env, but the underlying problem is worth fixing — revisit the Setting Positron as the default editor section above, which is where~/.bash_profilegets created.
Installing Python
Now use uv to install the version of Python that MDS starts with:
uv python install 3.14
This does not give you a command called python. That is intentional.
Try it and see:
python --version
bash: python: command not found
That is the correct answer.
uv did install a python3.14, but it does not have pandas
or any other MDS package in it.
The packages live inside projects, and uv run is how you reach them.
Note: If typing
pythonopens the Microsoft Store instead of printing an error, Windows has an “app execution alias” turned on for it. Do not install Python from the Microsoft Store. You can turn the alias off underSettings > Apps > Advanced app settings > App execution aliases, by switching off the entries forpython.exeandpython3.exe.
JupyterLab
JupyterLab is the other coding environment we use in MDS,
and there is nothing to install for it here.
Like every other Python package it comes with the project you are working in,
so you will start it with uv run jupyter lab from inside an assignment folder.
R, Rtools, and RStudio
R is another programming language that we will be using a lot in the MDS program. We will use R in RStudio and in Positron.
Note: R is not managed by uv. uv looks after Python and Python packages only; R packages are installed with R’s own
install.packages()and live in your R library. The two ecosystems stay separate, and that is deliberate — you do not need a project or auv runprefix to use R.
R
Go to https://cran.r-project.org/bin/windows/base/ and download the latest version of R for Windows. Open the file and follow the installer instructions accepting the default configuration.
After the installation is complete, we will add the R executables to the PATH variable in terminal so that you can use it without typing the full path to R each time. Open a terminal and type:
positron ~/.bash_profile
Append the following lines to the file
# Automatically expand the R version number
R_DIR=(/c/Program\ Files/R/*/bin/x64)
# Add R and Rscript to PATH
export PATH="$R_DIR:$PATH" # double quote is important here
Then save the file and close the Positron window. Now you can open a new terminal window and type
R --version
which should return something like:
R version 4.6.1 (2026-06-24) -- "Happy Hop"
Copyright (C) 2026 The R Foundation for Statistical Computing
Platform: x86_64-w64-mingw32/x64 (64-bit)

R is free software and comes with ABSOLUTELY NO WARRANTY.
You are welcome to redistribute it under the terms of the
GNU General Public License versions 2 or 3.
For more information about these matters see
https://www.gnu.org/licenses/.
Note: Install R from CRAN as described above, and not through conda or a language version manager. Those builds are put together differently and regularly cause problems when installing R packages later on.
RStudio
Download RStudio Desktop (not Pro) from the Posit downloads page. Under “Direct Downloads (Open Source)”, pick the Windows .exe file. Open the file and follow the installer instructions, accepting the default configuration.
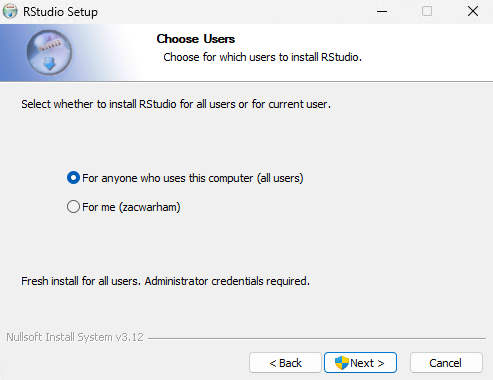
On the Choose Users page, keep the option that is already selected, “For anyone who uses this computer (all users)”, so that RStudio is installed for everyone like the rest of our tools. The installer will ask you for administrator credentials.
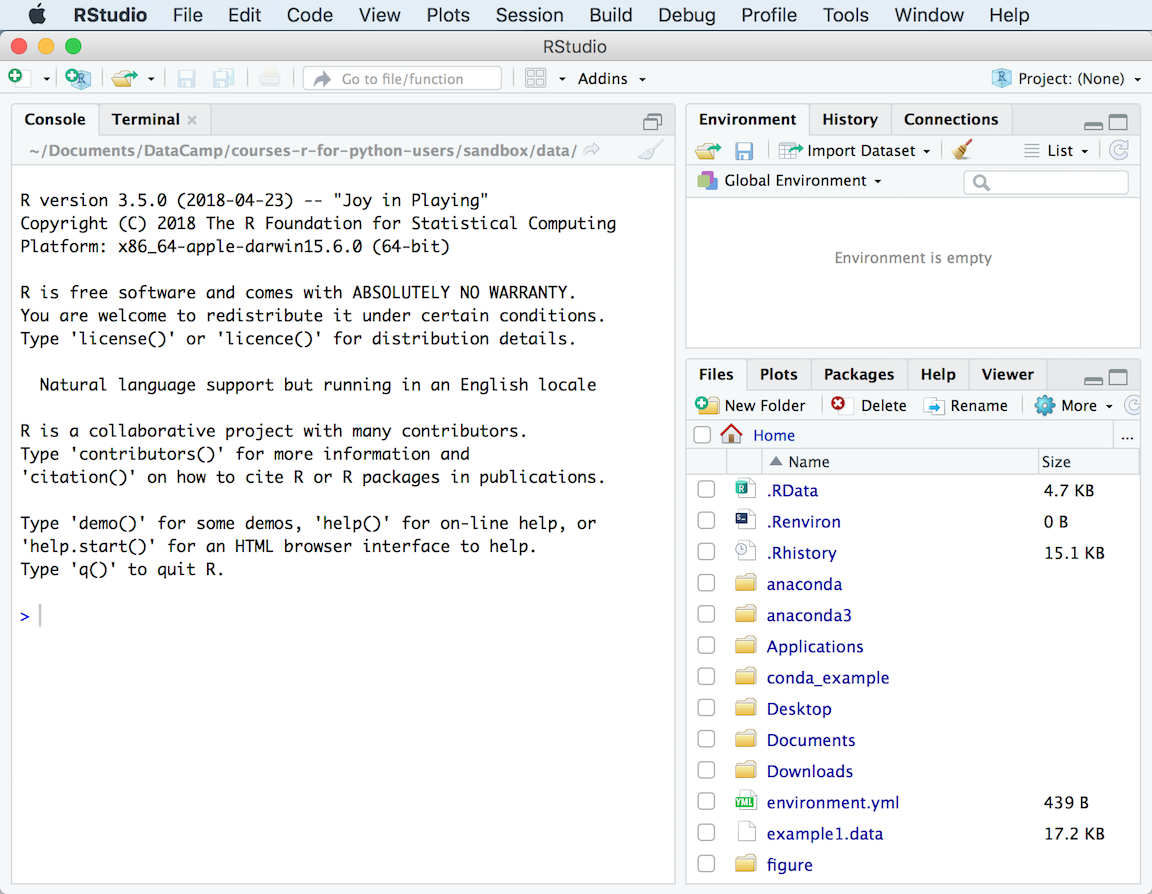
To see if you were successful, try opening RStudio by clicking on its icon. It should open and looks something like this picture below:
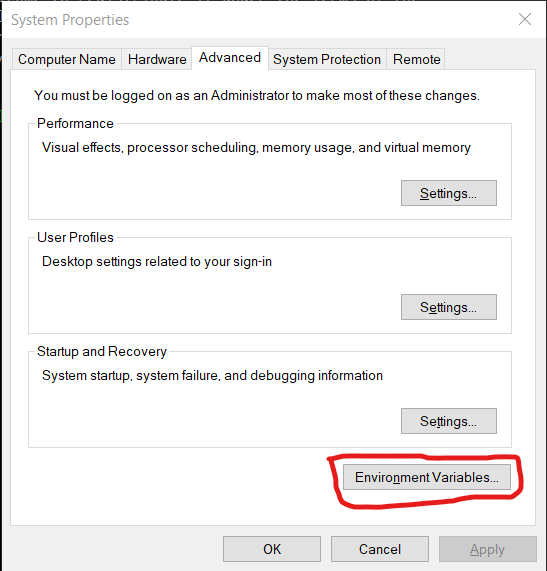
Next, we will make sure that Rstudio uses the same directories as R from terminal for its configuration. To do this, we will need to set an environmental variable in Windows. First, open the start menu, type “Edit the system environment variables” and select the match that reads “Edit the system environment variables”. Click the button at the bottom that reads “Environmental Variables…”:
Under “User variable” click the “New…” button:
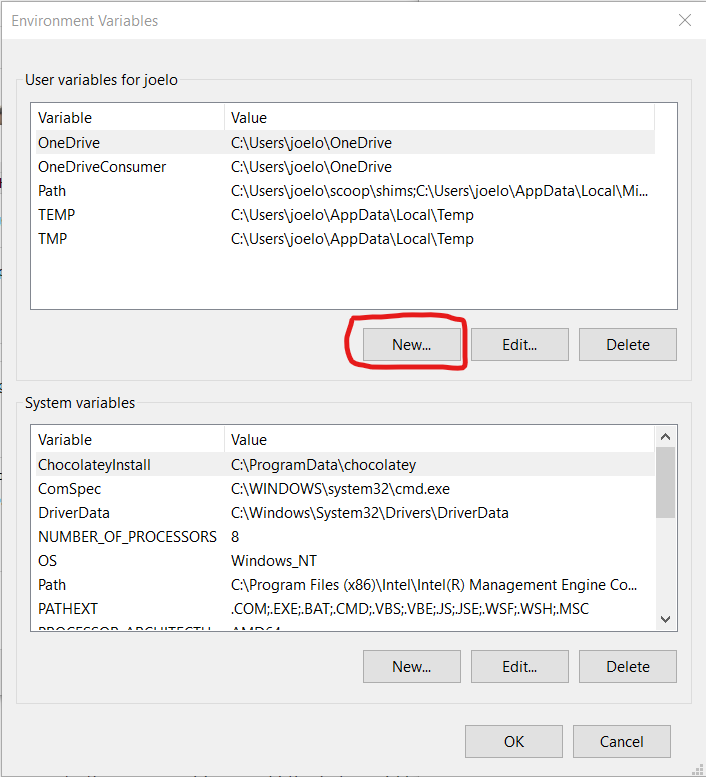
And type in R_USER as the “Variable name” and C:\Users\username as the “Variable value”, replacing username with your actual user name (if you don’t know your user name, look at the top of the screenshot above where it says “User variables for your_username”):
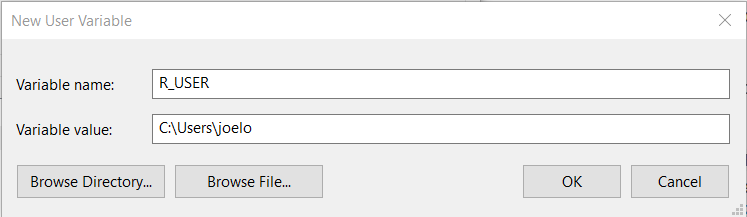
Click “OK” on all of the three windows we opened above and you’re done! If you open the console in RStudio and also R from the Windows Terminal (open Windows Terminal, type R, and then press enter) and type the following in both:
.libPaths()
both applications should return the same values, and the first one should be a path inside your user directory e.g.
[1] "C:/Users/janedoe/AppData/Local/R/win-library/4.6"
[2] "C:/Program Files/R/R-4.6.1/library"
If they don’t return the same paths, please try setting up your environmental variable again and making sure that it is pointing to the correct folder.
Do not continue unless both R from terminal and R from RStudio return the same paths here or later parts of the installation will fail.
Now we are going to check that RStudio’s Insert Pipe shortcut inserts the native pipe operator |>.
Press Shift + Ctrl + m in RStudio’s console. If it is returned the following operator %>% instead of |>, go to Tools > Global Options > Code > Editing and tick the following option:
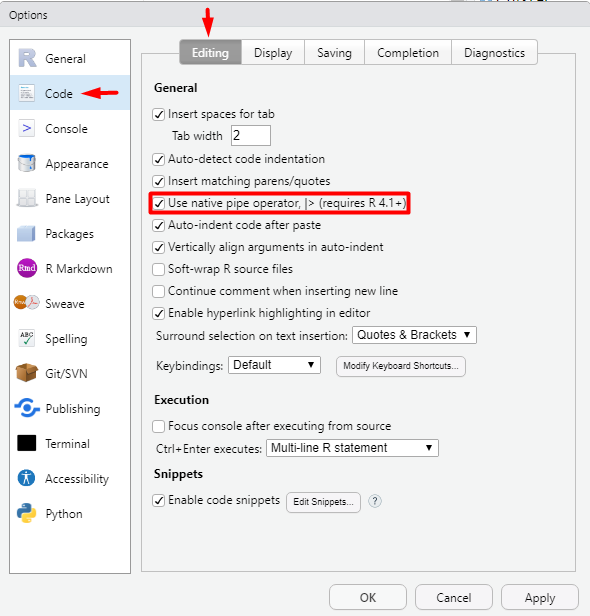
Once the change is made you can try again in the RStudio console Ctrl + Shift + m verify that it functions.
Next, we will set RStudio to start every session from a clean slate,
so that you always know exactly what is loaded in your environment
and your analyses run correctly from the code alone.
Go to Tools > Global Options > General > Basic and match the settings marked in the screenshot below:
untick “Restore most recently opened project at startup”,
“Restore previously open source documents at startup”,
and “Restore .RData into workspace at startup”,
and set “Save workspace to .RData on exit” to “Never”.
Click “OK” to save.
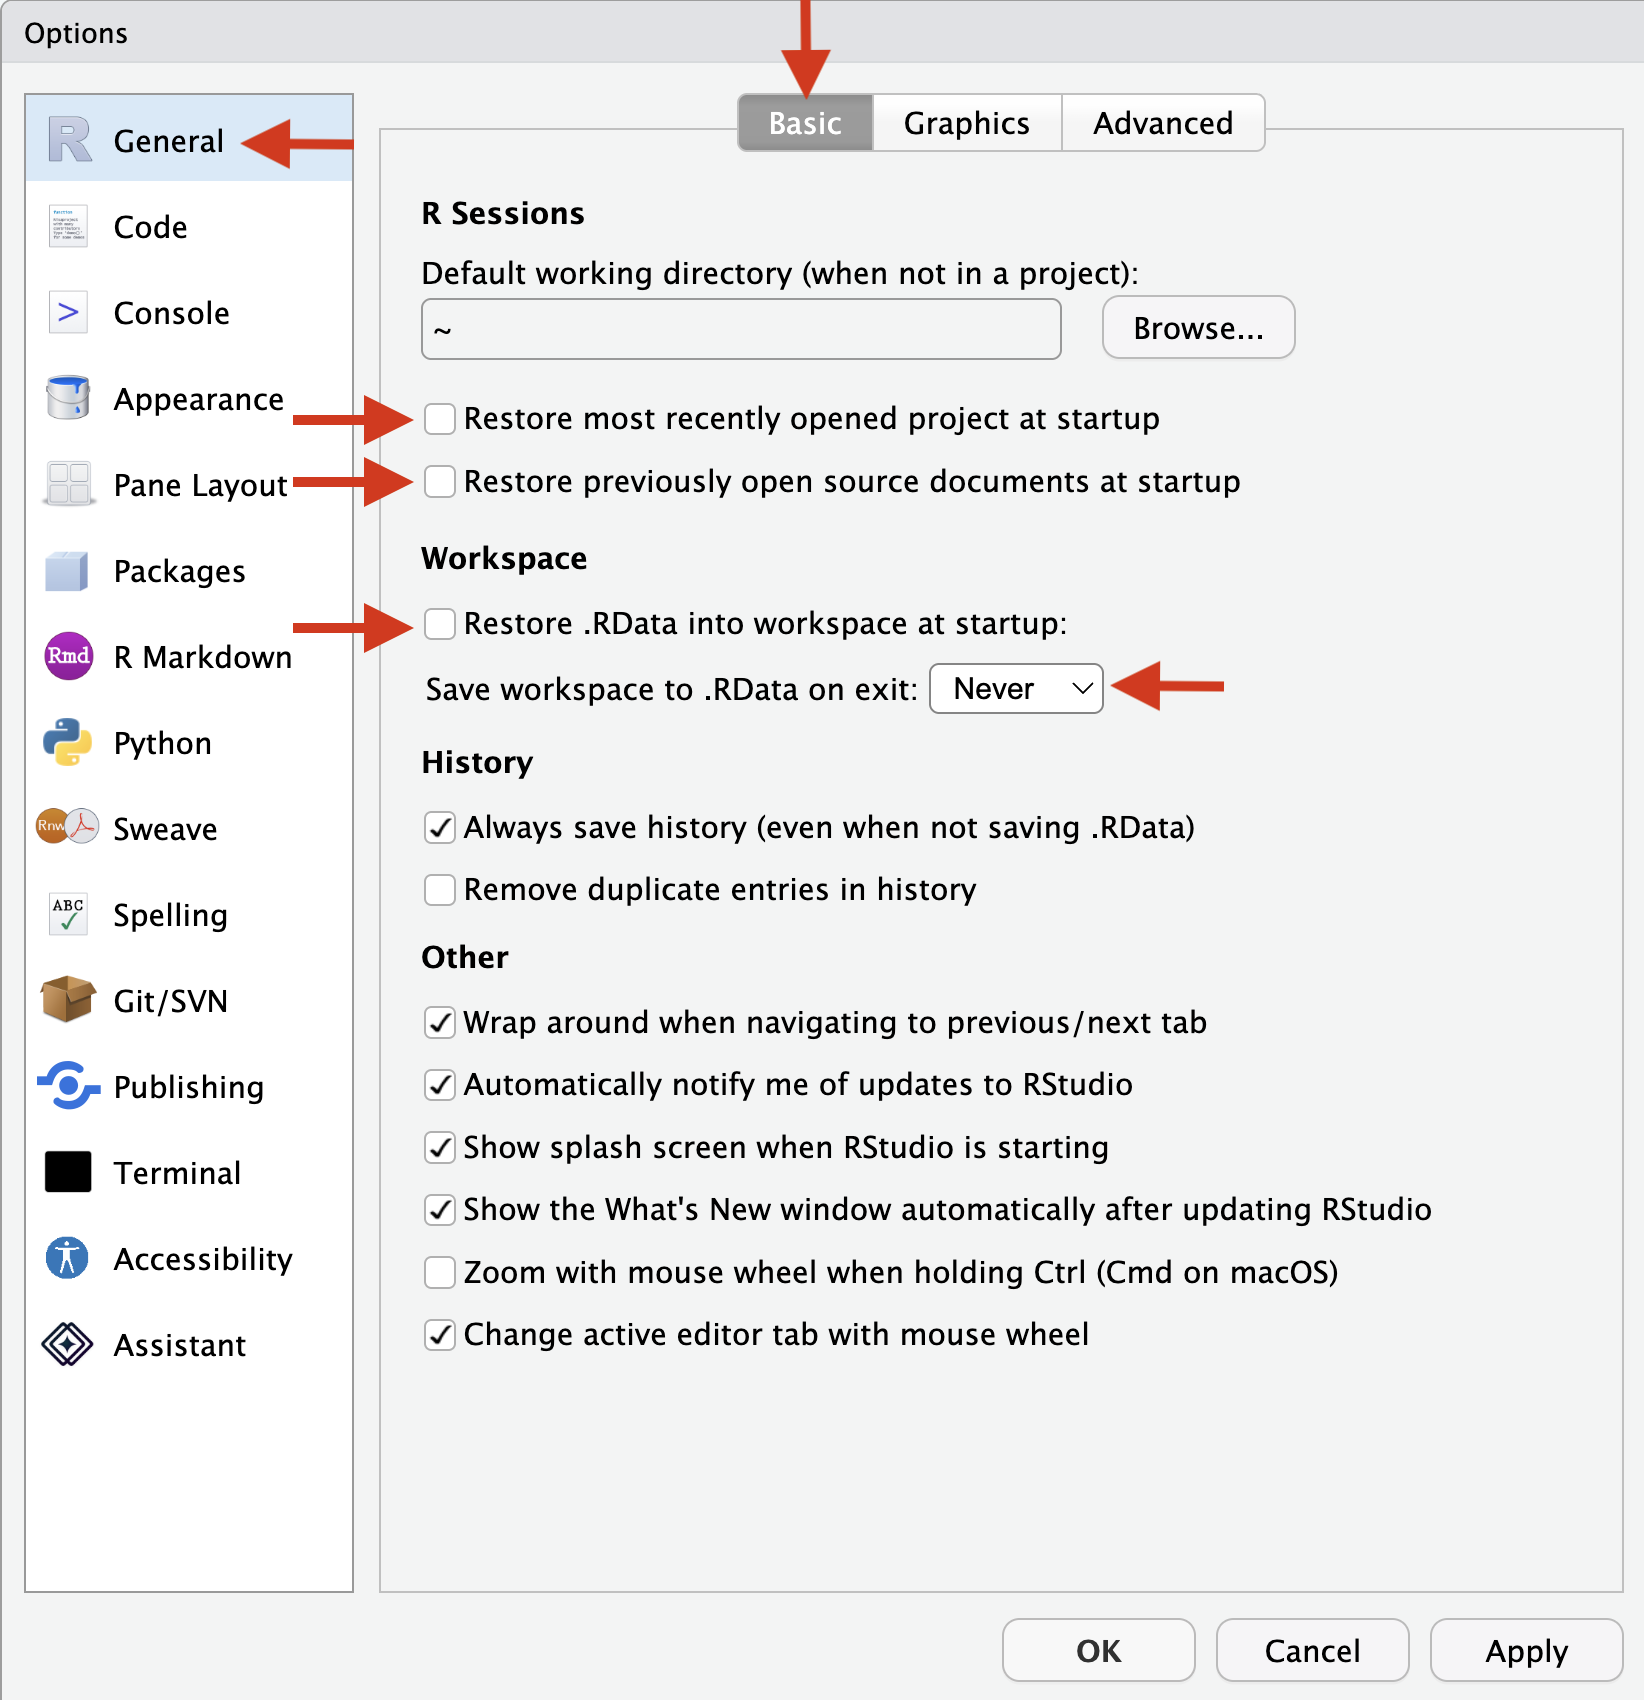
Close down RStudio afterwards.
Rtools
Windows users will also need to install Rtools, which will allow you to use external libraries. Go to https://cran.r-project.org/bin/windows/Rtools/ and download the latest version, which is Rtools 4.5 (it is used for every R release from 4.5.0 onwards, so its number does not have to match your R version). After the download has finished, run the installer with the default configuration. Do not follow the Rtools’ website instructions for “Putting Rtools on the PATH”. RStudio will put Rtools on the PATH automatically when it is needed.
To test if your installation was successful, open RStudio (restart it if you already have it open) and type the following into the Console:
install.packages("jsonlite", type = "source")
If the jsonlite package installs without errors, Rtools is setup correctly.
Installing R packages
Next, install the key R packages needed for the start of MDS program, by opening up RStudio and typing the following into the R console inside RStudio.
Note: If you are asked about installing into a personal library, select Yes.
Note: If you are asked to select a mirror, select the first
0-Cloudmirror.
install.packages('pak')
pak::pkg_install(c('tidyverse', 'renv', 'usethis', 'devtools', 'markdown', 'rmarkdown', 'languageserver', 'janitor', 'gapminder', 'readxl', "ucbds-infra/ottr", "ttimbers/canlang"))
Note: If you are asked to update packages during the installation, select the
Noneoption.
Stan
Stan is the language we will be using later on in the program for Bayesian statistics.
To install it open RStudio and install rstan
install.packages("StanHeaders", repos = c("https://stan-dev.r-universe.dev", getOption("repos")))
install.packages("rstan", repos = c("https://stan-dev.r-universe.dev", getOption("repos")))
Note: If you are asked to update packages during the installation, select the
Noneoption.
Test the installation with:
example(stan_model, package = "rstan", run.dontrun = TRUE)
The model should then compile and sample. Here’s a snippet of the output you should see:
SAMPLING FOR MODEL '16a540c6086086816528e4524def24d9' NOW (CHAIN 4).
Chain 4:
Chain 4: Gradient evaluation took 2e-06 seconds
Chain 4: 1000 transitions using 10 leapfrog steps per transition would take 0.02 seconds.
Chain 4: Adjust your expectations accordingly!
Chain 4:
Chain 4:
Chain 4: Iteration:    1 / 2000 [  0%]  (Warmup)
Chain 4: Iteration:  200 / 2000 [ 10%]  (Warmup)
Chain 4: Iteration:  400 / 2000 [ 20%]  (Warmup)
Chain 4: Iteration:  600 / 2000 [ 30%]  (Warmup)
Chain 4: Iteration:  800 / 2000 [ 40%]  (Warmup)
Chain 4: Iteration: 1000 / 2000 [ 50%]  (Warmup)
Chain 4: Iteration: 1001 / 2000 [ 50%]  (Sampling)
Chain 4: Iteration: 1200 / 2000 [ 60%]  (Sampling)
Chain 4: Iteration: 1400 / 2000 [ 70%]  (Sampling)
Chain 4: Iteration: 1600 / 2000 [ 80%]  (Sampling)
Chain 4: Iteration: 1800 / 2000 [ 90%]  (Sampling)
Chain 4: Iteration: 2000 / 2000 [100%]  (Sampling)
Chain 4:
Chain 4:  Elapsed Time: 0.003828 seconds (Warm-up)
Chain 4:                0.003417 seconds (Sampling)
Chain 4:                0.007245 seconds (Total)
Chain 4:
Note: If this step does not work, that is okay. It will not hold up the start of the program. Stan is not needed until block 5, so let your DSCI 521 instructor know that it failed and we will work on getting it going with you before then.
Make
Later in the program, we will be using make to automate our analysis scripts,
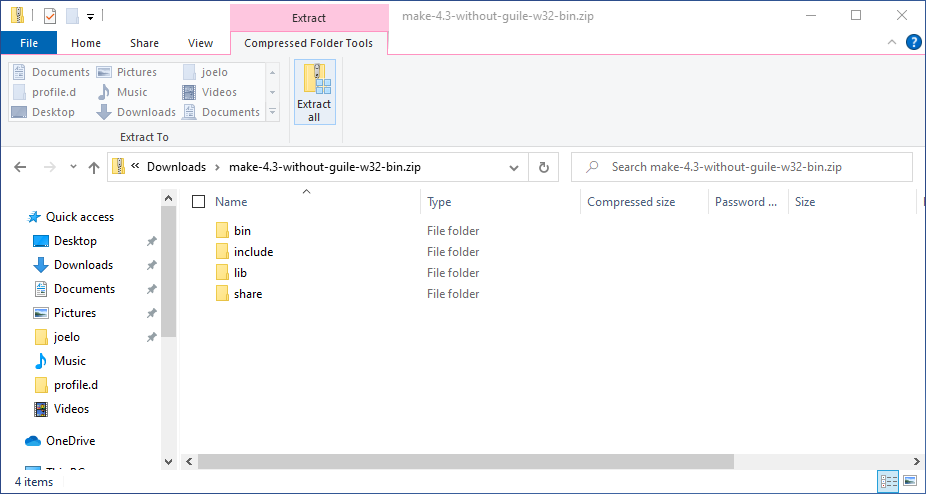
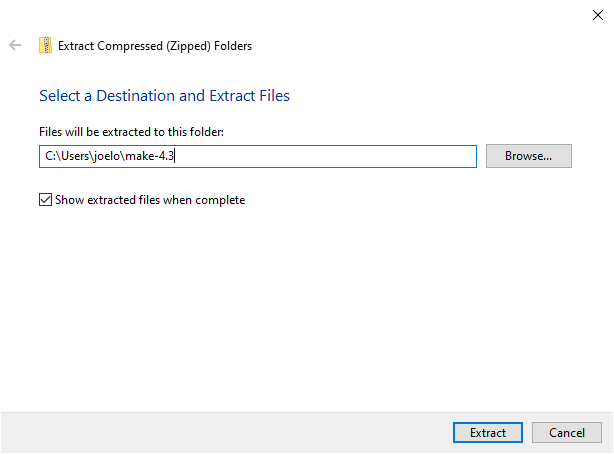
and we also use it in the next section to render documents. Download make from this URL. Click on the downloaded zip-file to open it in the File Explorer and click “Extract all” (in the toolbar at the top of the window on Windows 11, or in the “Extract” tab on Windows 10). Change the extract location to C:\Users\YOUR_USERNAME\make-4.4.1 (substituting in your actual username instead of YOUR_USERNAME) and click “Extract”. See the screenshots below if you’re unsure what to click.
Note: It is advisable to show file extensions by default in the Windows File Explorer. On Windows 11, click
Viewin the toolbar, thenShow, and tickFile name extensions. On Windows 10, click theViewtab and tick theFile name extensionsbox.
Next we need to add make’s bin folder to our PATH so that we can use the command make from the terminal (like we did with R earlier). Open the bash configuration file with Positron again by pasting this into a terminal:
positron ~/.bash_profile
And replace the section that reads:
# Add R and Rscript to PATH
export PATH="$R_DIR:$PATH" # double quote is important here
with the following to prepend make’s bin folder to the PATH
(note that ${USERNAME} below will be automatically expanded to your actual username by bash,
so you don’t need to replace it manually).
# Add R, Rscript, and Make to PATH
export PATH="/c/Users/${USERNAME}/make-4.4.1/bin:$R_DIR:$PATH" # double quotes are important here
Then save the file and close the Positron window. Launch a new terminal and run
make --version
which should return something like
GNU Make 4.4.1
Built for Windows32
Copyright (C) 1988-2023 Free Software Foundation, Inc.
License GPLv3+: GNU GPL version 3 or later <https://gnu.org/licenses/gpl.html>
This is free software: you are free to change and redistribute it.
There is NO WARRANTY, to the extent permitted by law.
LaTeX and PDF export
We will install the lightest possible version of LaTeX and it’s necessary packages as possible so that we can render Jupyter notebooks and R Markdown documents to html and PDF. If you have previously installed LaTeX, please uninstall it before proceeding with these instructions.
First, open RStudio and run the following commands to install the tinytex package and setup tinytex:
install.packages('tinytex')
tinytex::install_tinytex()
In order for Git Bash to be able to find the location of TinyTeX, you will need to sign out of Windows and back in again. After doing that, you can check that the installation worked by opening a terminal and asking for the version of latex:
latex --version
You should see something like this if you were successful:
pdfTeX 3.141592653-2.6-1.40.29 (TeX Live 2026)
kpathsea version 6.4.2
Copyright 2026 Han The Thanh (pdfTeX) et al.
There is NO warranty.  Redistribution of this software is
covered by the terms of both the pdfTeX copyright and
the Lesser GNU General Public License.
For more information about these matters, see the file
named COPYING and the pdfTeX source.
Primary author of pdfTeX: Han The Thanh (pdfTeX) et al.
Compiled with libpng 1.6.55; using libpng 1.6.55
Compiled with zlib 1.3.2; using zlib 1.3.2
Compiled with xpdf version 4.06
The above is all we need to have LaTeX work with R Markdown documents, however for Jupyter we need to add several more packages. Install them by pasting the following into the same terminal and pressing enter:
tlmgr.bat install eurosym \
  adjustbox \
  caption \
  collectbox \
  enumitem \
  environ \
  fp \
  jknapltx \
  parskip \
  pdfcol \
  pgf \
  rsfs \
  soul \
  tcolorbox \
  titling \
  trimspaces \
  ucs \
  ulem \
  upquote \
  lwarp \
  oberdiek \
  atkinson
Note:
atkinsonis the Atkinson Hyperlegible typeface, from the Braille Institute. It is designed so that characters which usually look alike do not —I l 1,O 0,rnandm— which is worth having in a program where you read code and output all day. It is installed here so that a document can ask for it; nothing requires you to use it.If you would also like it in your editor, both families are on Google Fonts (Next for text, Mono for code) and install like any other font. That is entirely optional and separate from the package above.
mds-setup-checkcarries a short guide with the YAML to copy into a document, for both HTML and PDF.
PostgreSQL
We will be using PostgreSQL as our database management system. Download the latest PostgreSQL 17 installer for Windows from the EnterpriseDB download page. That page also lists newer major versions such as 18, but please install 17. (Ubuntu students install whatever their release carries, which is 16 or 18; the setup check accepts any of the three). Follow the instructions for the installation. In the password page, type whatever password you want, and make sure you save it using a password manager or similar so that you know what it is in November when the SQL course starts (otherwise you will need to reinstall PostgreSQL). For all the other options, use the default. You do not need to run “StackBuilder” at the end of the installation (if you accidentally launch the StackBuilder, click “cancel”, you don’t need to check any boxes).
To test if the installation was successful open the SQL Shell app from the Start menu. You will be asked to setup your configuration, accept the default value (the one within square brackets) for the first four values by pressing enter four times, then type in your password and press enter one last time. It should look like this if it is working correctly:
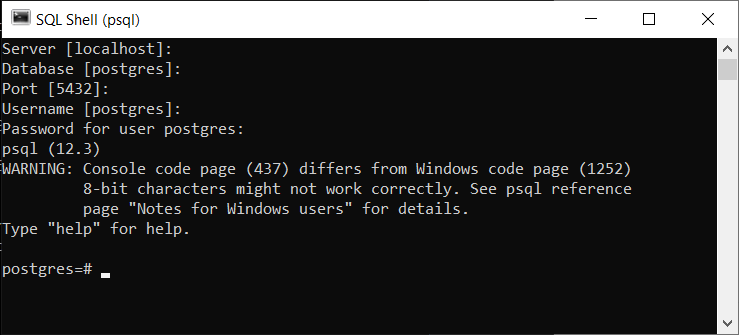
If you are asked about stackbuilder, you can skip this for now.
Docker
You will use Docker to create reproducible, sharable and shippable computing environments for your analyses. For this you will need a Docker account, which you can sign up for free here.
Then go to the Docker Desktop install instructions for Windows and download the installer for Windows (x86_64). Follow the installation instructions on that page, keeping the WSL 2 backend enabled.
Note: If you see a warning saying that your WSL installation is incomplete, you can click the link to install the kernel update and then restart per the instructions in the warning message.
Launch Docker Desktop; you may be asked to install Windows Subsystem for Linux (WSL). Follow the instructions to install WSL. Restart Docker to finish setting it up.
After installation (Docker will make you sign out to finish installing), launch a terminal and type
docker run hello-world
which should output something like this:
Unable to find image 'hello-world:latest' locally
latest: Pulling from library/hello-world
0e03bdcc26d7: Pulling fs layer
0e03bdcc26d7: Verifying Checksum
0e03bdcc26d7: Download complete
0e03bdcc26d7: Pull complete
Digest: sha256:49a1c8800c94df04e9658809b006fd8a686cab8028d33cfba2cc049724254202
Status: Downloaded newer image for hello-world:latest
Hello from Docker!
This message shows that your installation appears to be working correctly.
To generate this message, Docker took the following steps:
 1. The Docker client contacted the Docker daemon.
 2. The Docker daemon pulled the "hello-world" image from the Docker Hub.
    (amd64)
 3. The Docker daemon created a new container from that image which runs the
    executable that produces the output you are currently reading.
 4. The Docker daemon streamed that output to the Docker client, which sent it
    to your terminal.
To try something more ambitious, you can run an Ubuntu container with:
 $ docker run -it ubuntu bash
Share images, automate workflows, and more with a free Docker ID:
 https://hub.docker.com/
For more examples and ideas, visit:
 https://docs.docker.com/get-started/
Improving the bash configuration
To improve your experience using bash, we recommend appending a few lines to the end of your bash configuration file. These make it easier to use the TAB key for autocompletion improves how bash handles the command history, and the appearance of the terminal (we will talk more about these topics during class). It also adds colors to the terminal’s text, which can make it easier to navigate visually. First, open the configuration file:
positron ~/.bash_profile
Then paste the following at the end of the file (make sure not to overwrite any existing lines) and save it afterwards:
# Show unstaged (*) and staged (+) changes in the prompt string
export GIT_PS1_SHOWDIRTYSTATE=1

# TAB completion configuration
# TAB completion ignores case
bind "set completion-ignore-case on"
# Require only one instead of two TAB presses before showing matches
bind "set show-all-if-ambiguous on"
# If there are multiple matches for completion, cycle through them with TAB
bind 'TAB':menu-complete
# Perform partial completion on the first Tab press,
# only start cycling full results on the second Tab press
bind "set menu-complete-display-prefix on"

# History configuration
# Cycle through history based on characters already typed on the line
bind '"\e[A":history-search-backward'
bind '"\e[B":history-search-forward'
# Append to the history file, don't overwrite it.
shopt -s histappend
# Write commands to history one-by-one right after they are executed
# instead of all together when the terminal is closed.
# Make new terminals see all commands run in currently open terminals and
# prepend a newline to the prompt string to separate it from the last command's output
PROMPT_COMMAND='history -a; echo'
# Increase history size
HISTSIZE=50000
HISTFILESIZE=50000

# Aliases and functions
# Note that aliases only are in effect when you are using the shell interactively
# (e.g. opening the terminal and typing or pasting commands).
# If you run a bash script or makefile,
# the original command is used instead of your alias.
# ---
# MDS help script
alias mds-help='bash ~/.mds-help.sh'
# Some common operations
alias l='ls -lthAF'
alias jl='uv run jupyter lab'
alias gl='git log --date short -10 --pretty=format:"%C(auto,yellow)%h %C(auto,blue)%ad%C(auto)%d %C(auto,reset)%s"'
alias gt='git status'
alias gm='git commit -m'
alias gap='git add -p'
# Move, remove, and copy show what was done and prompt before overwriting files.
alias rm="rm -vI"
alias mv="mv -vi"
alias cp="cp -vi"
alias mkdir="mkdir -vp"
# Case insensitive grep by default
alias grep='grep -i'
# `man` function to display help messages with a pager as on Unix
man() {
    $1 --help | less
}
Finally, download and save the MDS help script via the following command.
curl -Ssfo ~/.mds-help.sh https://ubc-mds.github.io/mds-setup-check/mds-help.sh
Open a new terminal and type mds-help,
your terminal should display
the most important terminal commands we will be learning in MDS.
You don’t need to memorize these now,
just remember that if you ever forget how to do something with bash, git or uv,
you can type mds-help in your terminal
and use it as a reference.
Post-installation notes
You have completed the installation instructions, well done 🙌! We have created a script to help you check that your installation was successful, and to provide instructions for how you can troubleshoot any issues. To run this script, please execute the following command from your terminal.
bash <(curl -Ssf https://ubc-mds.github.io/mds-setup-check/check-setup-mds.sh)
The script checks the Python side of your installation from inside a small project
that we ship for the purpose,
so it will ask permission to download that project into your home folder
as ~/mds-setup-check.
Answer y, and give it a few minutes on a good connection —
it downloads several hundred megabytes the first time.
Note: The script always makes that folder itself and will not reuse one that is already there, because it can only vouch for a copy it downloaded. So if you run the script again after fixing something, it will ask whether to delete
~/mds-setup-checkand download a fresh copy. Answering yes deletes that folder and everything in it, so if you have saved any work of your own in there, answer no and move it somewhere else first. The answer defaults to no — a bare Enter keeps the folder and skips the Python and document export checks. Saying yes costs you very little: the downloads are cached, so setting it up a second time takes seconds.
You can delete the folder for good once you have submitted your setup-check log.
The output from running the script will look something like this:
# MDS setup check v2026.08.18

If a program or package is marked as MISSING,
this means that you are missing the required version of that program or package.
Either it is not installed at all or the wrong version is installed.
The required version is indicated with a number and an asterisk (*),
e.g. 4.* means that all versions starting with 4 are accepted (4.0.1, 4.2.5, etc).

The "Document export" section is the exception. It tries several different ways of
turning a document into a PDF, and you only need one of them to work, so lines
marked FAILED there are fine. What matters is the summary at the end of that
section, which says whether PDF export works at all.

You can run the following commands to find out which version
of a program or package is installed (if any):

```
name_of_program --version  # For system programs
cd ~/mds-setup-check && uv pip list  # For Python packages
R -q -e "as.data.frame(installed.packages()[,3])"  # For R packages
```

Checking program and package versions...

## Operating system
Windows 11 Professional 24H2
AMD64
10.0.26100

## System programs
OK        psql (PostgreSQL) 17.6
OK        rstudio 2026.08.0+187
OK        tlmgr revision 79491 (2026-06-27 19:40:15 +0200)
OK        R 4.6.1 (2026-06-24) -- "Happy Hop"
OK        uv 0.12.3
OK        bash 5.2.37(1)-release (x86_64-pc-msys)
OK        git 2.55.0.windows.1
OK        make 4.4.1
OK        latex 3.141592653-2.6-1.40.29 (TeX Live 2026)
OK        docker 29.6.2, build dfc4efb
OK        positron 2026.08.0 build 331
OK        quarto 1.10.3
OK        pandoc 3.10.2

## Python packages
OK        Python 3.14.3
OK        otter-grader=7.0.0
OK        pandas=3.0.5
OK        nbconvert=7.17.1
OK        playwright=1.62.0
OK        jupyterlab=4.6.3
OK        jupyterlab-git=0.54.1
OK        jupyterlab-spellchecker=0.9.0
OK        jupytext=1.19.5
OK        ipykernel=7.3.0

## R packages
OK        tidyverse=2.0.0
OK        markdown=2.0
OK        rmarkdown=2.31
OK        renv=1.2.3
OK        tinytex=0.60
OK        janitor=2.2.1
OK        gapminder=1.0.1
OK        readxl=1.5.0
OK        ottr=1.5.2
OK        canlang=0.0.1

## Document export
You only need ONE of the PDF routes below to work.
A FAILED line here is not a problem by itself -- read the summary at the end.
OK        quarto Typst PDF-generation was successful.
OK        quarto LaTeX PDF-generation was successful.
OK        jupyterlab PDF-generation was successful.
FAILED    jupyterlab WebPDF-generation failed. Check that jupyterlab, nbconvert,
          and playwright are marked OK above, then read the detailed error message below.
OK        jupyterlab HTML-generation was successful.
OK        rmarkdown PDF-generation was successful.
OK        rmarkdown HTML-generation was successful.

OK        PDF export works. 4 of 5 routes succeeded,
          and one is all you need. Ignore any FAILED lines above.

## Environment
Not recorded. You were asked, and chose not to include them.

## Content of .bash_profile
...

## Content of .bashrc
...

## Python installations

### Python installations already on this computer (v2026.08.18)

This is a report only. Nothing below has been changed or removed.
uv will work even if you change nothing at all.

## Python and pip commands on your PATH
...

## What to do about it

  Nothing needs your attention. Carry on with the installation instructions.

The above output has been saved to the file /c/Users/janedoe/check-setup-mds.log
together with system configuration details and any detailed error messages about PDF and HTML generation.
You can open this folder in your file browser by typing `explorer .` (without the surrounding backticks).
Before sharing the log file, review that there is no SENSITIVE INFORMATION such as passwords or access tokens in it.
As you can see at the end of the output, a log file is saved in your current directory. We might ask you to upload this file if we need to troubleshoot your installation, so that we can help you more effectively. If any of your packages are marked as “MISSING” you will need to figure out what is wrong and possibly reinstall them. A “FAILED” line is different: it appears only in the “Document export” section, where several ways of producing a PDF are tried and you only need one of them. Read the summary at the end of that section rather than the individual lines – if it says “PDF export works”, there is nothing for you to fix.
On Windows, jupyterlab WebPDF-generation always fails, as in the sample above.
Nothing on your machine is wrong and there is nothing to fix – the other PDF routes
are what your courses will use.
Once all packages are marked as “OK” we will ask you to submit this log file, so that we can confirm that your installation was successful. Details on where to submit will be provided later.
The script asks two questions while it runs.
- Whether to set the check project up in your home folder — or, if you have run the
script before and
~/mds-setup-checkis still there, whether to delete that folder and download a fresh copy. Answery. Without it, the Python and document export checks are all skipped. (Answering yes to the second form deletes that folder and everything in it, so move out anything of your own first.) - Whether to include your environment variables in the log. Answer no (just press Enter) unless an instructor asks you to include them. Environment variables often hold API keys and access tokens, and you are about to send this log to us.
Copy the command above exactly as written, including the <( and ). If you run it as
curl ... | bash instead, the script has no terminal to ask you anything with, both
answers stay at their defaults, and it skips every Python and Quarto check.
Note: In general you should be careful running scripts unless they come from a trusted source as in this case (just like how you should be careful when downloading and installing programs on your computer).
Visual Studio Code (optional)
Positron is the editor we use in MDS, and it is all you need for the program. Visual Studio Code (VS Code) is a more general-purpose editor that some students and instructors like to keep around for work outside of data science, so instructions for setting it up are collected here. Nothing in MDS requires it.
Go to https://code.visualstudio.com/download and download the Windows version of VS Code. After the download has finished, run the installer and accept the default configuration for all pages except for the following:
- Optional On the Select Additional Tasks page, check “Create a desktop icon” under “Additional icons”.
- Also on the Select Additional Tasks page check all four boxes under “Other”
- “Add ‘Open with Code’ action to Windows file context menu”
- “Add ‘Open with Code’ action to Windows directory context menu”
- “Register Code as an editor for supported file types”
- “Add to PATH” (this should be selected by default).
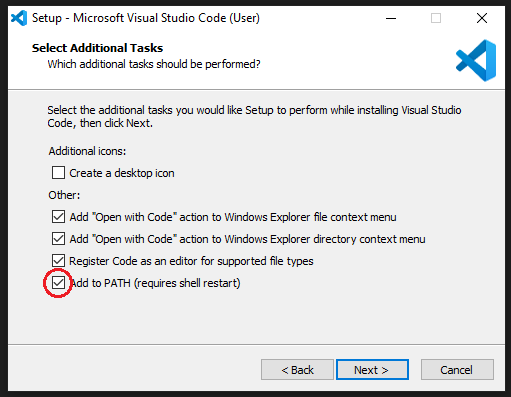
From within VS Code you can open the Extension Marketplace to browse and install extensions by clicking on the Extensions icon in the Activity Bar indicated in the figure below.
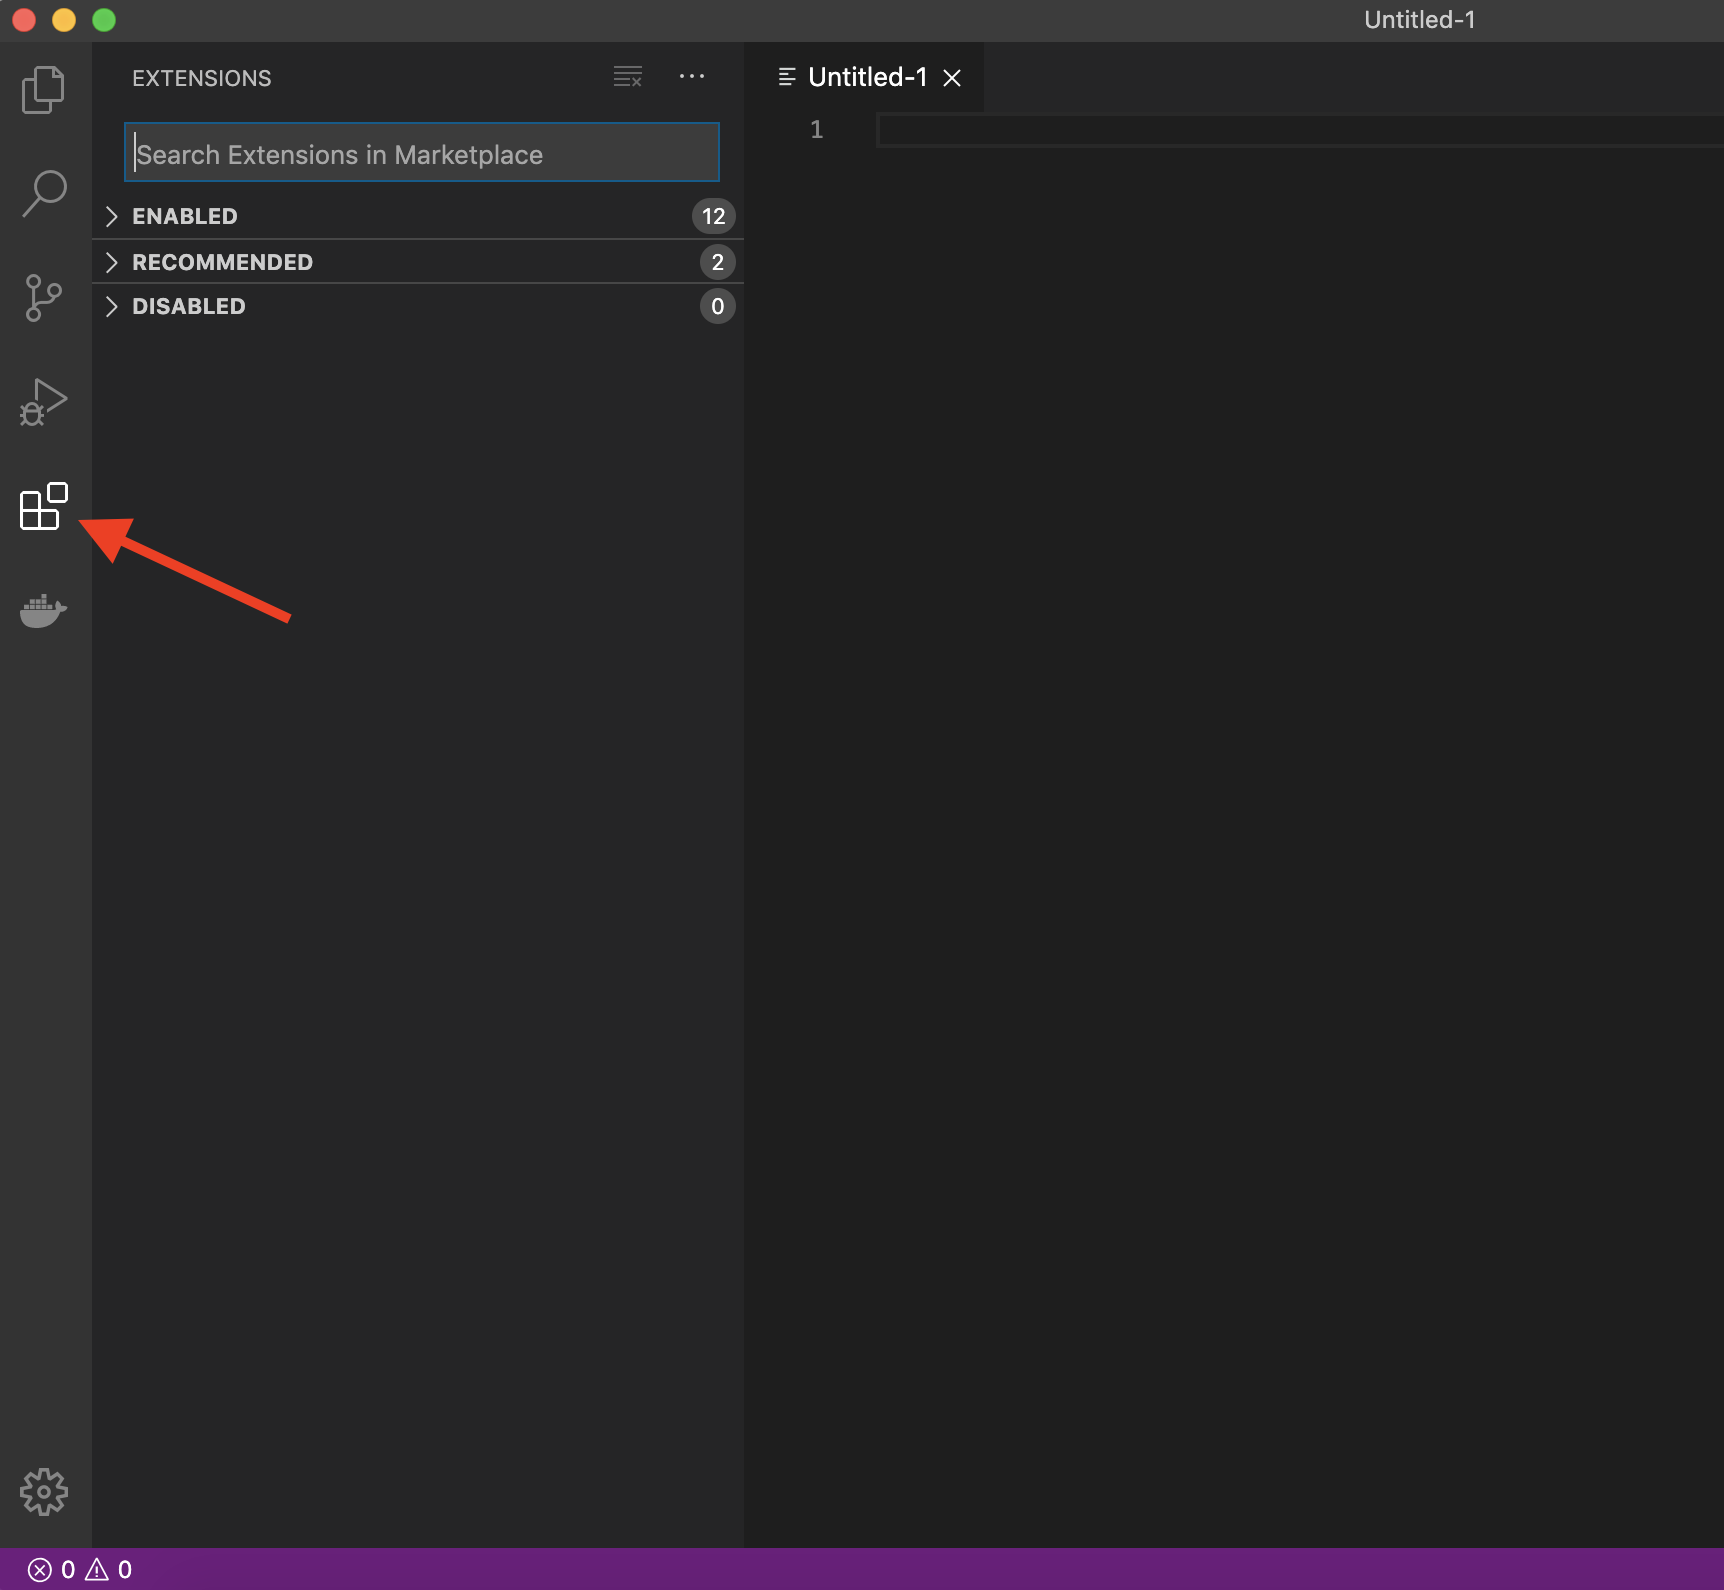
To install an extension, search for it in the search bar, click the extension you want, and then click “Install”. These are the ones that pair well with the rest of the MDS software stack:
- Python (everything Python: notebooks, debugging, linting, formatting, etc.)
- markdownlint (markdown linting and style checking extension)
- GitLens (powerful extension that extends VS Code’s native git capabilities)
- Git History (intuitive view of your git history)
- Container Tools (easily use Docker from VS Code; this replaced the older extension that was called “Docker”)
- Quarto (integrated render and preview for Quarto documents and more)
Note: The list above is for VS Code only. Do not install Microsoft’s Python or R extensions into Positron: they are not compatible with it, and Positron already has its own Python and R support built in.