Appendix
Keeping your fork up to date with the main GitHub repository
In this course you will be using a Fork-Pull Request workflow on GitHub, where the main GitHub repository is under the UBC-MDS organization and you have your own fork off of that. You will send your contributions from your own fork to the main repository as a pull request, and another team member will review and accept them.
Inadvertently, your fork will fall behind the main repository in the UBC-MDS organization. Here’s how you catch your repository back up:
The first time you need to catch up, you have to tell your computer where the upstream repository (here the one in the UBC-MDS organization) is:
git remote add upstream <original_repo_URL>
Then to catch up this time (and any other time) you type:
git fetch upstream
git merge upstream/main
These two commands together are like a git pull from the repo you forked. And will update the repository on your laptop. To update your fork of the repository on GitHub.com you will need to push:
git push
VS Code settings
Recommended VS Code settings from Tom:
{
    "workbench.settings.editor": "json",
    "python.linting.flake8Enabled": true,
    "python.linting.pylintEnabled": false,
    "workbench.settings.openDefaultSettings": true,
    "workbench.settings.useSplitJSON": true,
    "workbench.settings.openDefaultKeybindings": true,
    "editor.formatOnSave": true,
    "python.formatting.provider": "black",
    "jupyter.sendSelectionToInteractiveWin
}
Using Python in RStudio
Mac & Linux users
You can now use RStudio as an effective Python IDE. To do so, follow these steps after installing miniconda:
Install the {reticulate} package:
install.packages("reticulate")Install the {png} package (a dependency of reticulate that is not well managed yet):
install.packages("png")Find your path to miniconda by typing
which pythonin a terminal (Git Bash on Windows) outside of RStudioSpecify that {reticulate} should use the miniconda version of Python in your
.Rprofilefile:
type
usethis::edit_r_profileinto the R console inside RStudio, and an.Rprofilefile from your HOME directory should open in RStudioadd this to your
.Rprofilefile:Sys.setenv(RETICULATE_PYTHON = "path_to_miniconda's_python")replacing"path_to_miniconda's_python"with the path to your miniconda Python
In terminal type
code ~/.bash_profileand add the lineexport PATH="/opt/miniconda3/bin:$PATH", replacing/opt/miniconda3/binwith the path to the folder containing your miniconda Python (be careful not to includepythonat the end of this path).Restart R!
Start using Python in RStudio by typing
repl_python()in the R console, or running a line of Python code from a Python script from the RStudio editor by Cntrl + enter. Or by running scripts from the terminal inside RStudio.
Windows users
Install the {reticulate} package:
install.packages("reticulate")Install the {png} package (a dependency of reticulate that is not well managed yet):
install.packages("png")Find your path to miniconda by typing
which pythonin a terminal (Git Bash on Windows) outside of RStudioSpecify that {reticulate} should use the miniconda version of Python in your
.Rprofilefile:
type
usethis::edit_r_profileinto the R console inside RStudio, and an.Rprofilefile from your HOME directory should open in RStudioadd this to your
.Rprofilefile:Sys.setenv(RETICULATE_PYTHON = "path_to_miniconda's_python")replacing"path_to_miniconda's_python"with the path to your miniconda Python. In Windows, you need\\instead of a\to separate the directories, for example my path here would be:C:\\Users\\tiffany.timbers\\miniconda3\\python.exe.
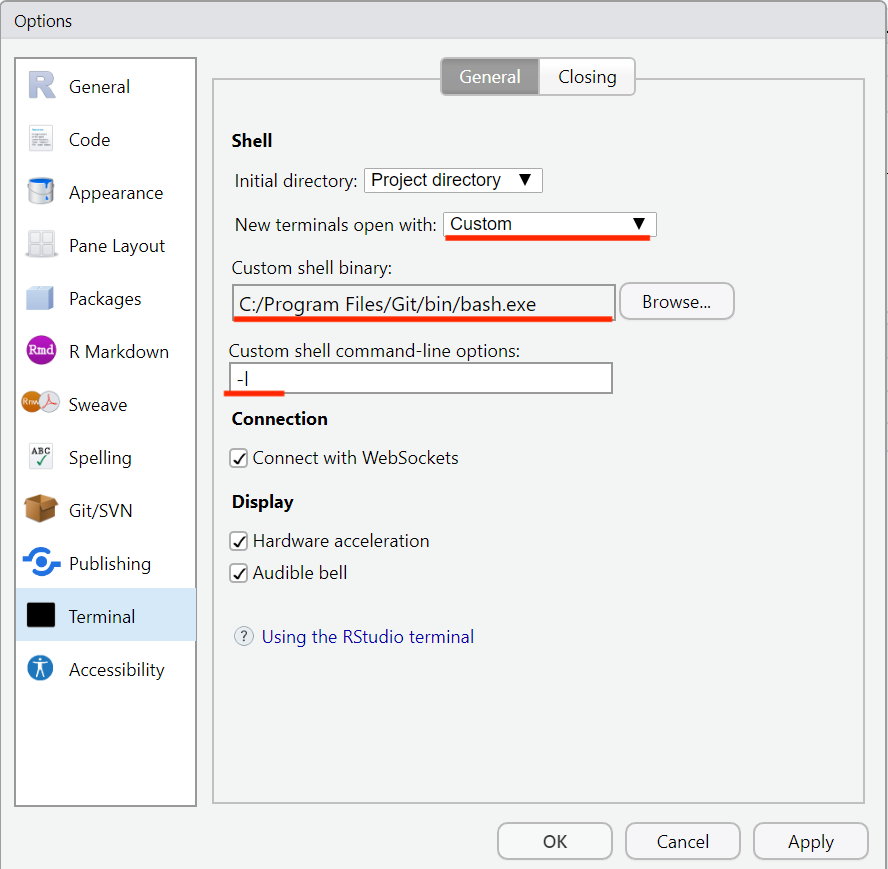
Open Global Options in RStudio and in the Terminal sub-menu, select “Custom” as the “New terminals to open with” option, and add the path to GitBash (should be something like
C:/Program Files/Git/bin/bash.exe) as the “Custom shell binary” option. Finally set-l(lower case L) as the option for “Custom shell command-line options”.
Restart R! Open R and close the terminal tab. Open a new terminal.

Start using Python in RStudio by typing
repl_python()in the R console, or running a line of Python code from a Python script from the RStudio editor by Cntrl + enter. Or by running scripts from the terminal inside RStudio.
Debugging tools in R & Python
Task |
R |
Python |
|
|---|---|---|---|
|
Look at the death certificate to get some general information about the death |
|
|
|
Do a post mortem autopsy find further evidence of why it died |
|
|
|
Revive the dead so it may walk again |
|
|


Source (images and R functions): Jenny Bryan’s rstudio::conf 2020 talk
Using print_last in Python
import traceback
x = [2, 4, 6]
x[3]
---------------------------------------------------------------------------
IndexError                                Traceback (most recent call last)
<ipython-input-2-765df518d8c9> in <module>
      1 x = [2, 4, 6]
----> 2 x[3]

IndexError: list index out of range
traceback.print_last()
Traceback (most recent call last):
  File "/opt/anaconda3/lib/python3.7/site-packages/IPython/core/interactiveshell.py", line 3331, in run_code
    exec(code_obj, self.user_global_ns, self.user_ns)
  File "<ipython-input-2-765df518d8c9>", line 2, in <module>
    x[3]
IndexError: list index out of range
Using pdb.postmortem to do a postmortem
import pdb
import sys
x = [2, 4, 6]
x[3]
---------------------------------------------------------------------------
IndexError                                Traceback (most recent call last)
<ipython-input-5-765df518d8c9> in <module>
      1 x = [2, 4, 6]
----> 2 x[3]

IndexError: list index out of range
pdb.pm()
> <ipython-input-5-765df518d8c9>(2)<module>()
-> x[3]
(Pdb) x
[2, 4, 6]
(Pdb) x[3]
*** IndexError: list index out of range
(Pdb) x[2]
6
(Pdb) q
Using breakpoint in Python:
x = [2, 4, 6]
breakpoint()
x[3]
--Return--
> <ipython-input-7-ede97edf4895>(2)<module>()->None
-> breakpoint()
(Pdb) x
[2, 4, 6]
(Pdb) x[3]
*** IndexError: list index out of range
(Pdb) x[2]
6
(Pdb) q
---------------------------------------------------------------------------
BdbQuit                                   Traceback (most recent call last)
<ipython-input-7-ede97edf4895> in <module>
      1 x = [2, 4, 6]
----> 2 breakpoint()
      3 x[3]

/opt/anaconda3/lib/python3.7/bdb.py in trace_dispatch(self, frame, event, arg)
     90             return self.dispatch_call(frame, arg)
     91         if event == 'return':
---> 92             return self.dispatch_return(frame, arg)
     93         if event == 'exception':
     94             return self.dispatch_exception(frame, arg)

/opt/anaconda3/lib/python3.7/bdb.py in dispatch_return(self, frame, arg)
    152             finally:
    153                 self.frame_returning = None
--> 154             if self.quitting: raise BdbQuit
    155             # The user issued a 'next' or 'until' command.
    156             if self.stopframe is frame and self.stoplineno != -1:

BdbQuit:
Create a reprex to get help
As you work on projects in MDS, and then your work in the real world, you are going to be doing MANY things you haven’t done before, and you are going to hit points when you need to ask others for help.
If you watched Jenny’s rstudio::conf 2020 video this week, you learned about the importance of creating a reproducible and minimal working example to optimize your chance of getting help.
Furthermore, writing a reproducible and minimal working example will not only help you get help more easily, often times the process of doing this will help you find your own bug and fix it!